It is much more stylish compared to that of hardwood and carpets, also, as it can use oak, cherry, slate, marble, and so on, for the so-called "wear layer" of this powder room floor. In case you're shopping for serious colors as well as shiny textures, select inlaid vinyl which have style granules embedded in them.
Images about Draw A Bathroom Floor Plan
While cheap & run vinyl are functional, pricier ones come with colors that are deep and pages and can be laid out on patterns to give the bathroom of yours a cool and chic look. You often go barefoot within the bathroom, for example, for this reason the feel of the floor of its can be just as important as the way that it appears. In case you are searching for a bold appearance, go in for tiles with bright colors and bold prints & patterns.
10 Essential Bathroom Floor Plans
%20(1).jpg?widthu003d800u0026nameu003d1-01%20(1)%20(1).jpg)
For example, a Victorian style bath room may be tiled using pale green or purple or even beige colored tiles with fragile floral as well as artistic prints. You can not just pick the best design for your bath room, though you are able to in addition create modified tiles by choosing 2 individual patterns and affixing them inside an alternating layout.
Types of bathrooms and layouts Half bath design, Bathroom floor

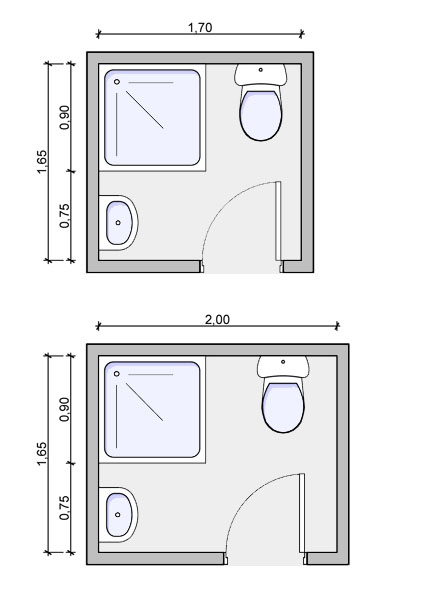
Bathroom Floor Plan

Latest Posts Under: Bathroom layout Master bathroom layout

Common Bathroom Floor Plans: Rules of Thumb for Layout u2013 Board
How to draw 5×10 Bathroom Floor Plans

Henry Bathroom Floor Plans
Small Bathroom Layout Ideas That Work – This Old House
/cdn.vox-cdn.com/uploads/chorus_asset/file/19996681/03_fl_plan.jpg)
Bathroom Planner – Create 3D Bathroom Layouts in Minutes – Cedreo

Common Bathroom Floor Plans: Rules of Thumb for Layout u2013 Board
Bathroom Planner – Design Your Own Bathroom Online – RoomSketcher

10 Essential Bathroom Floor Plans
%20(1).jpg?widthu003d800u0026nameu003d2-01%20(1)%20(1).jpg)
Types of bathrooms and layouts
Related Posts:
- Vinyl Sheet Flooring For Bathroom
- Temporary Bathroom Flooring For Renters
- Ada Compliant Bathroom Floor Plan
- Bathroom Floor Lights
- 2 Way Bathroom Floor Plans
- What Do I Need To Tile A Bathroom Floor
- Are Laminate Floors Good For Bathrooms
- Acid Wash Bathroom Tile Floor
- Bathroom Floor And Shower Tile Ideas
- Bathroom Floor Vent Cover
Draw A Bathroom Floor Plan: Design Your Dream Bathroom
Introduction
Designing a bathroom can be an exciting and creative process. Whether you’re building a new home or renovating an existing one, drawing a bathroom floor plan is an essential step to visualize the layout and ensure that all your design ideas fit seamlessly into the space. In this article, we will guide you through the process of drawing a bathroom floor plan, providing detailed instructions, tips, and answers to commonly asked questions.
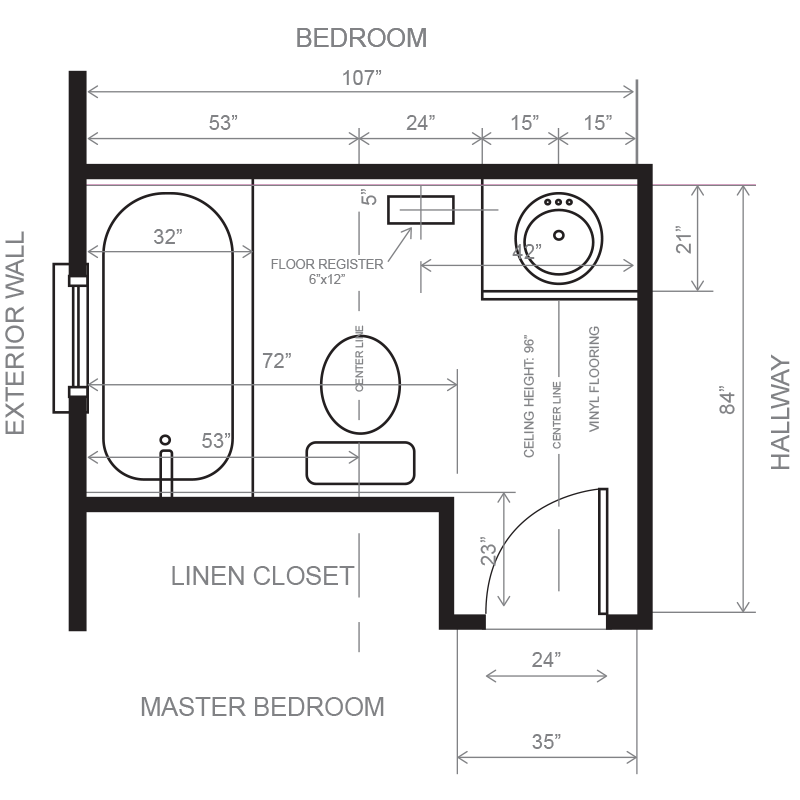
1. Gather Your Measurements
Before you begin drawing your bathroom floor plan, it’s crucial to gather accurate measurements of the space. Start by measuring the length and width of your bathroom walls using a tape measure. Note down these measurements on a piece of graph paper or use online floor planning tools for precision.
FAQ: How do I measure a bathroom for a floor plan?
To measure your bathroom accurately, start by measuring each wall from corner to corner. Include doors, windows, and any other architectural features in your measurements. Remember to measure the height of the room as well. Use a tape measure and record all dimensions in feet and inches.
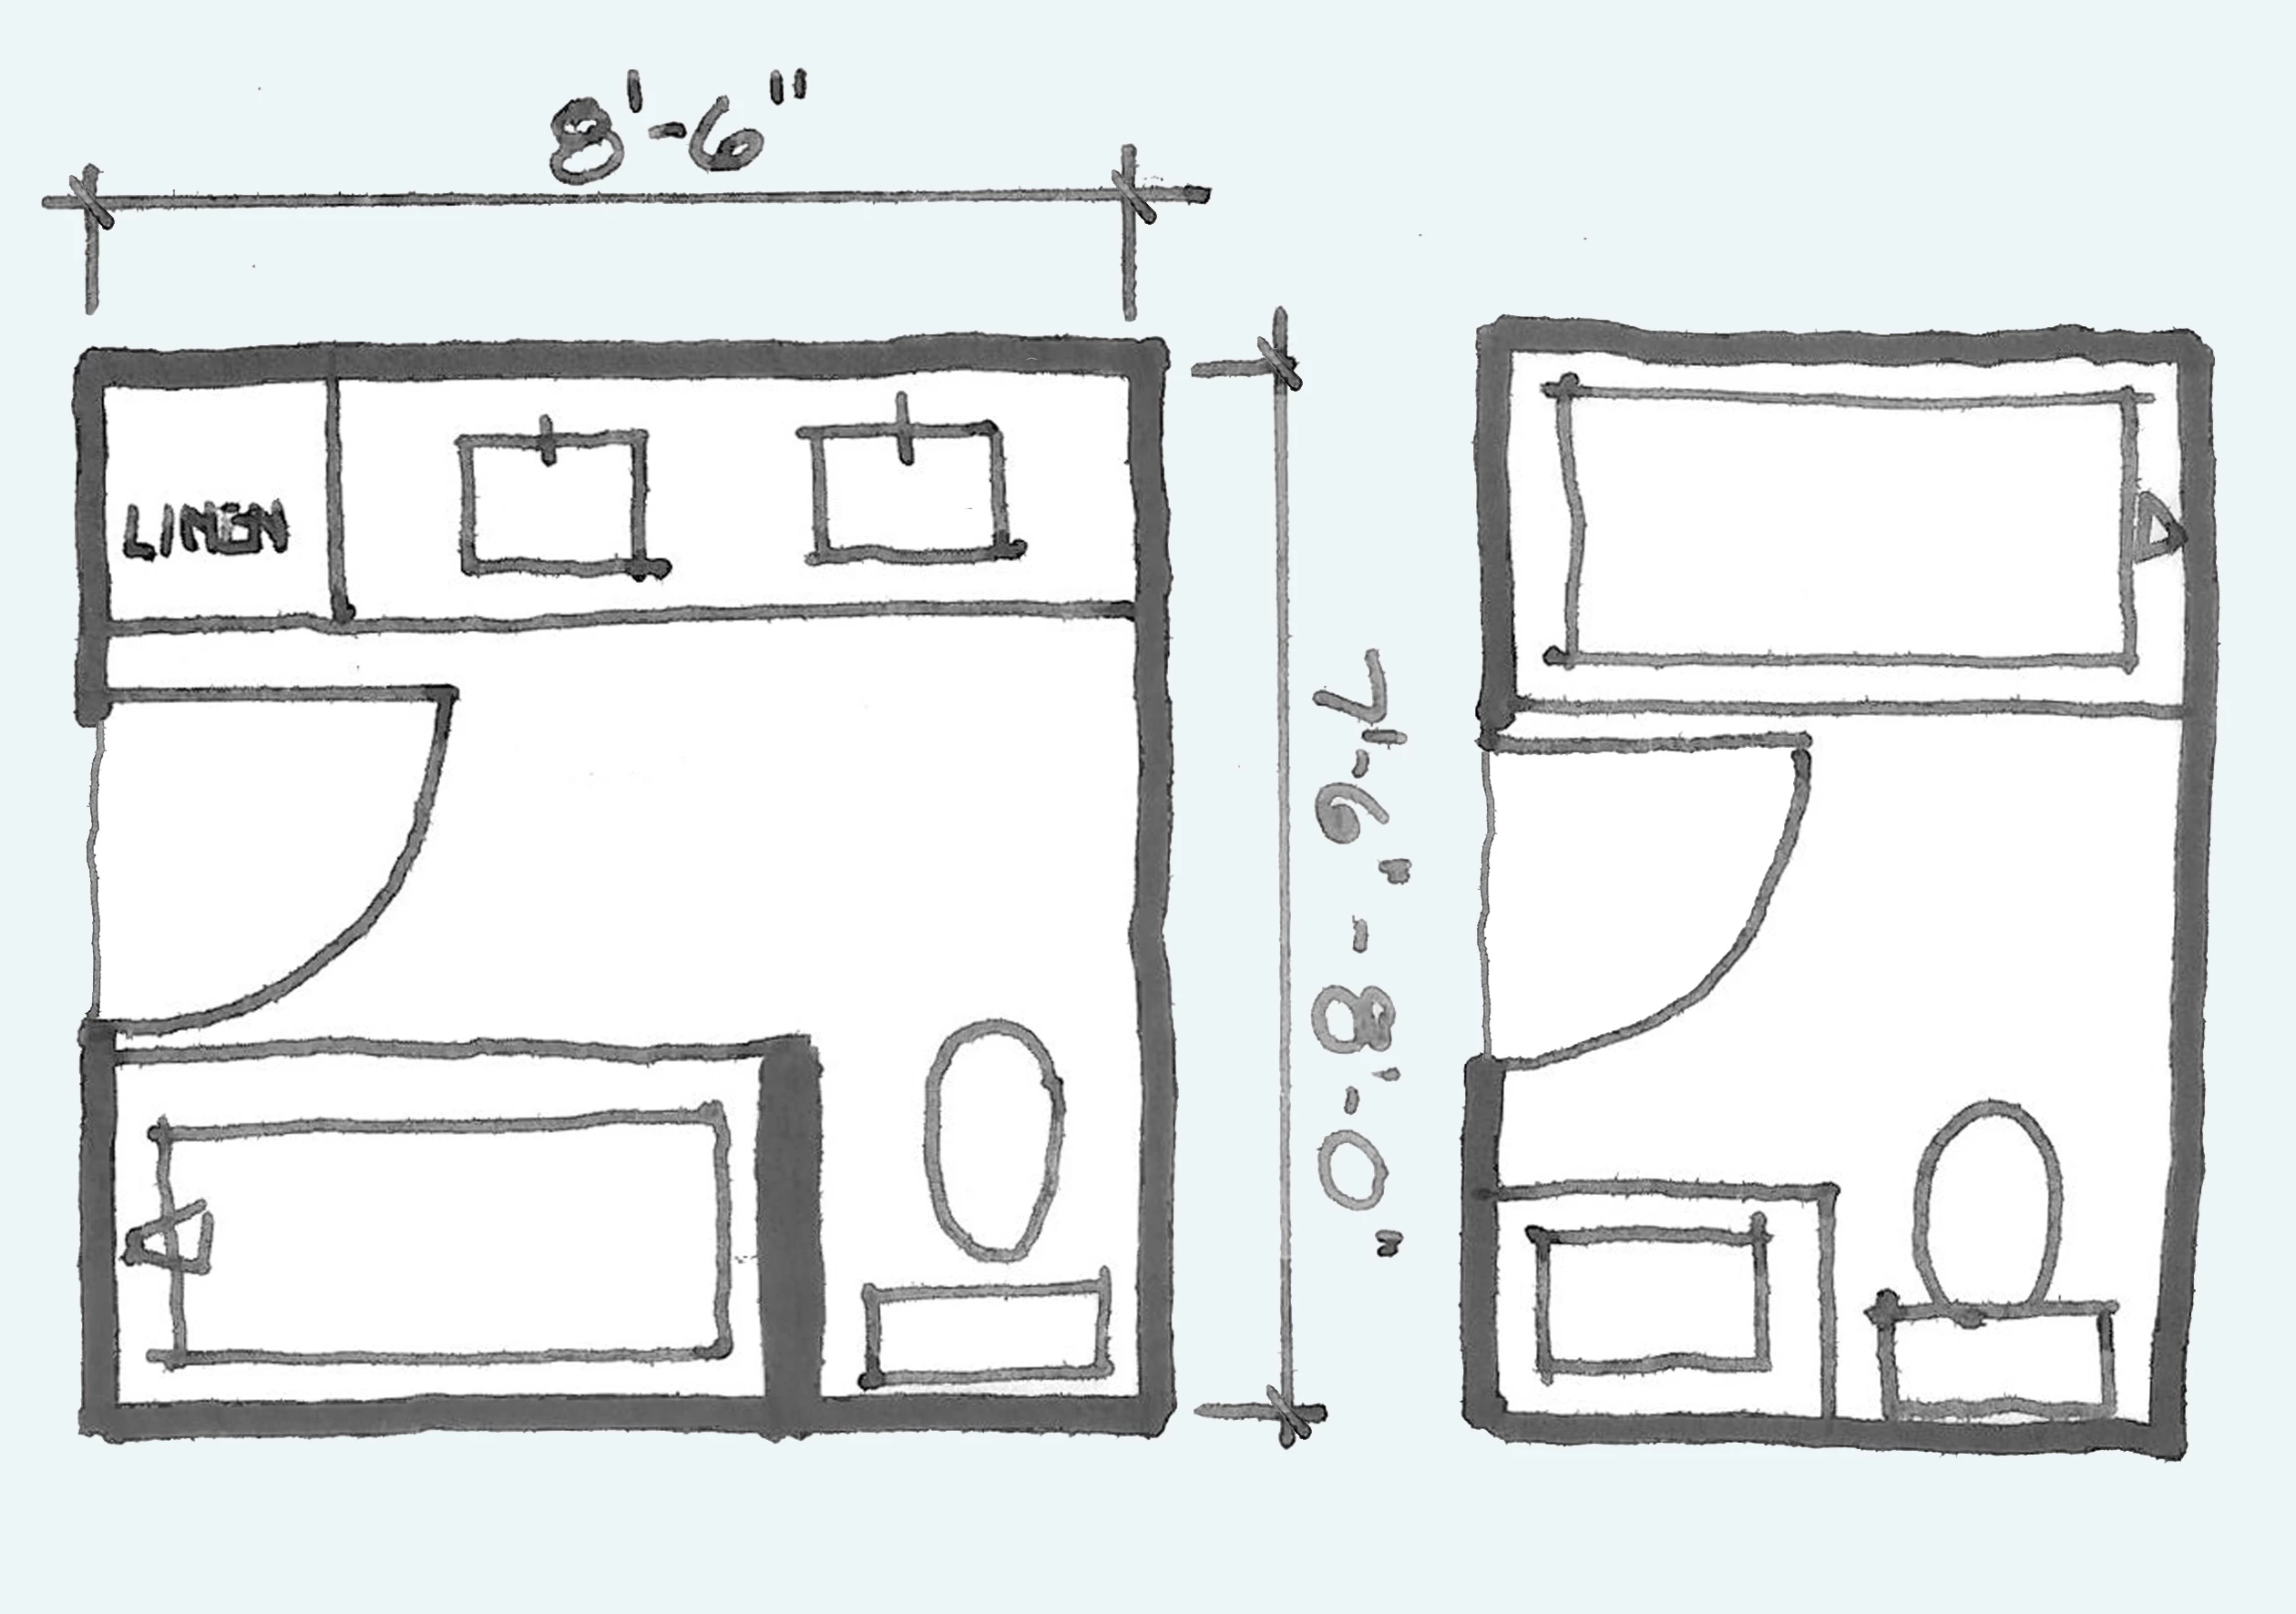
2. Determine Your Bathroom Layout
Once you have gathered all the necessary measurements, you can now decide on the layout of your bathroom. Consider factors such as plumbing connections, electrical outlets, and fixtures like sinks, toilets, showers, and bathtubs. Depending on the size and shape of your bathroom, various layout options are available:
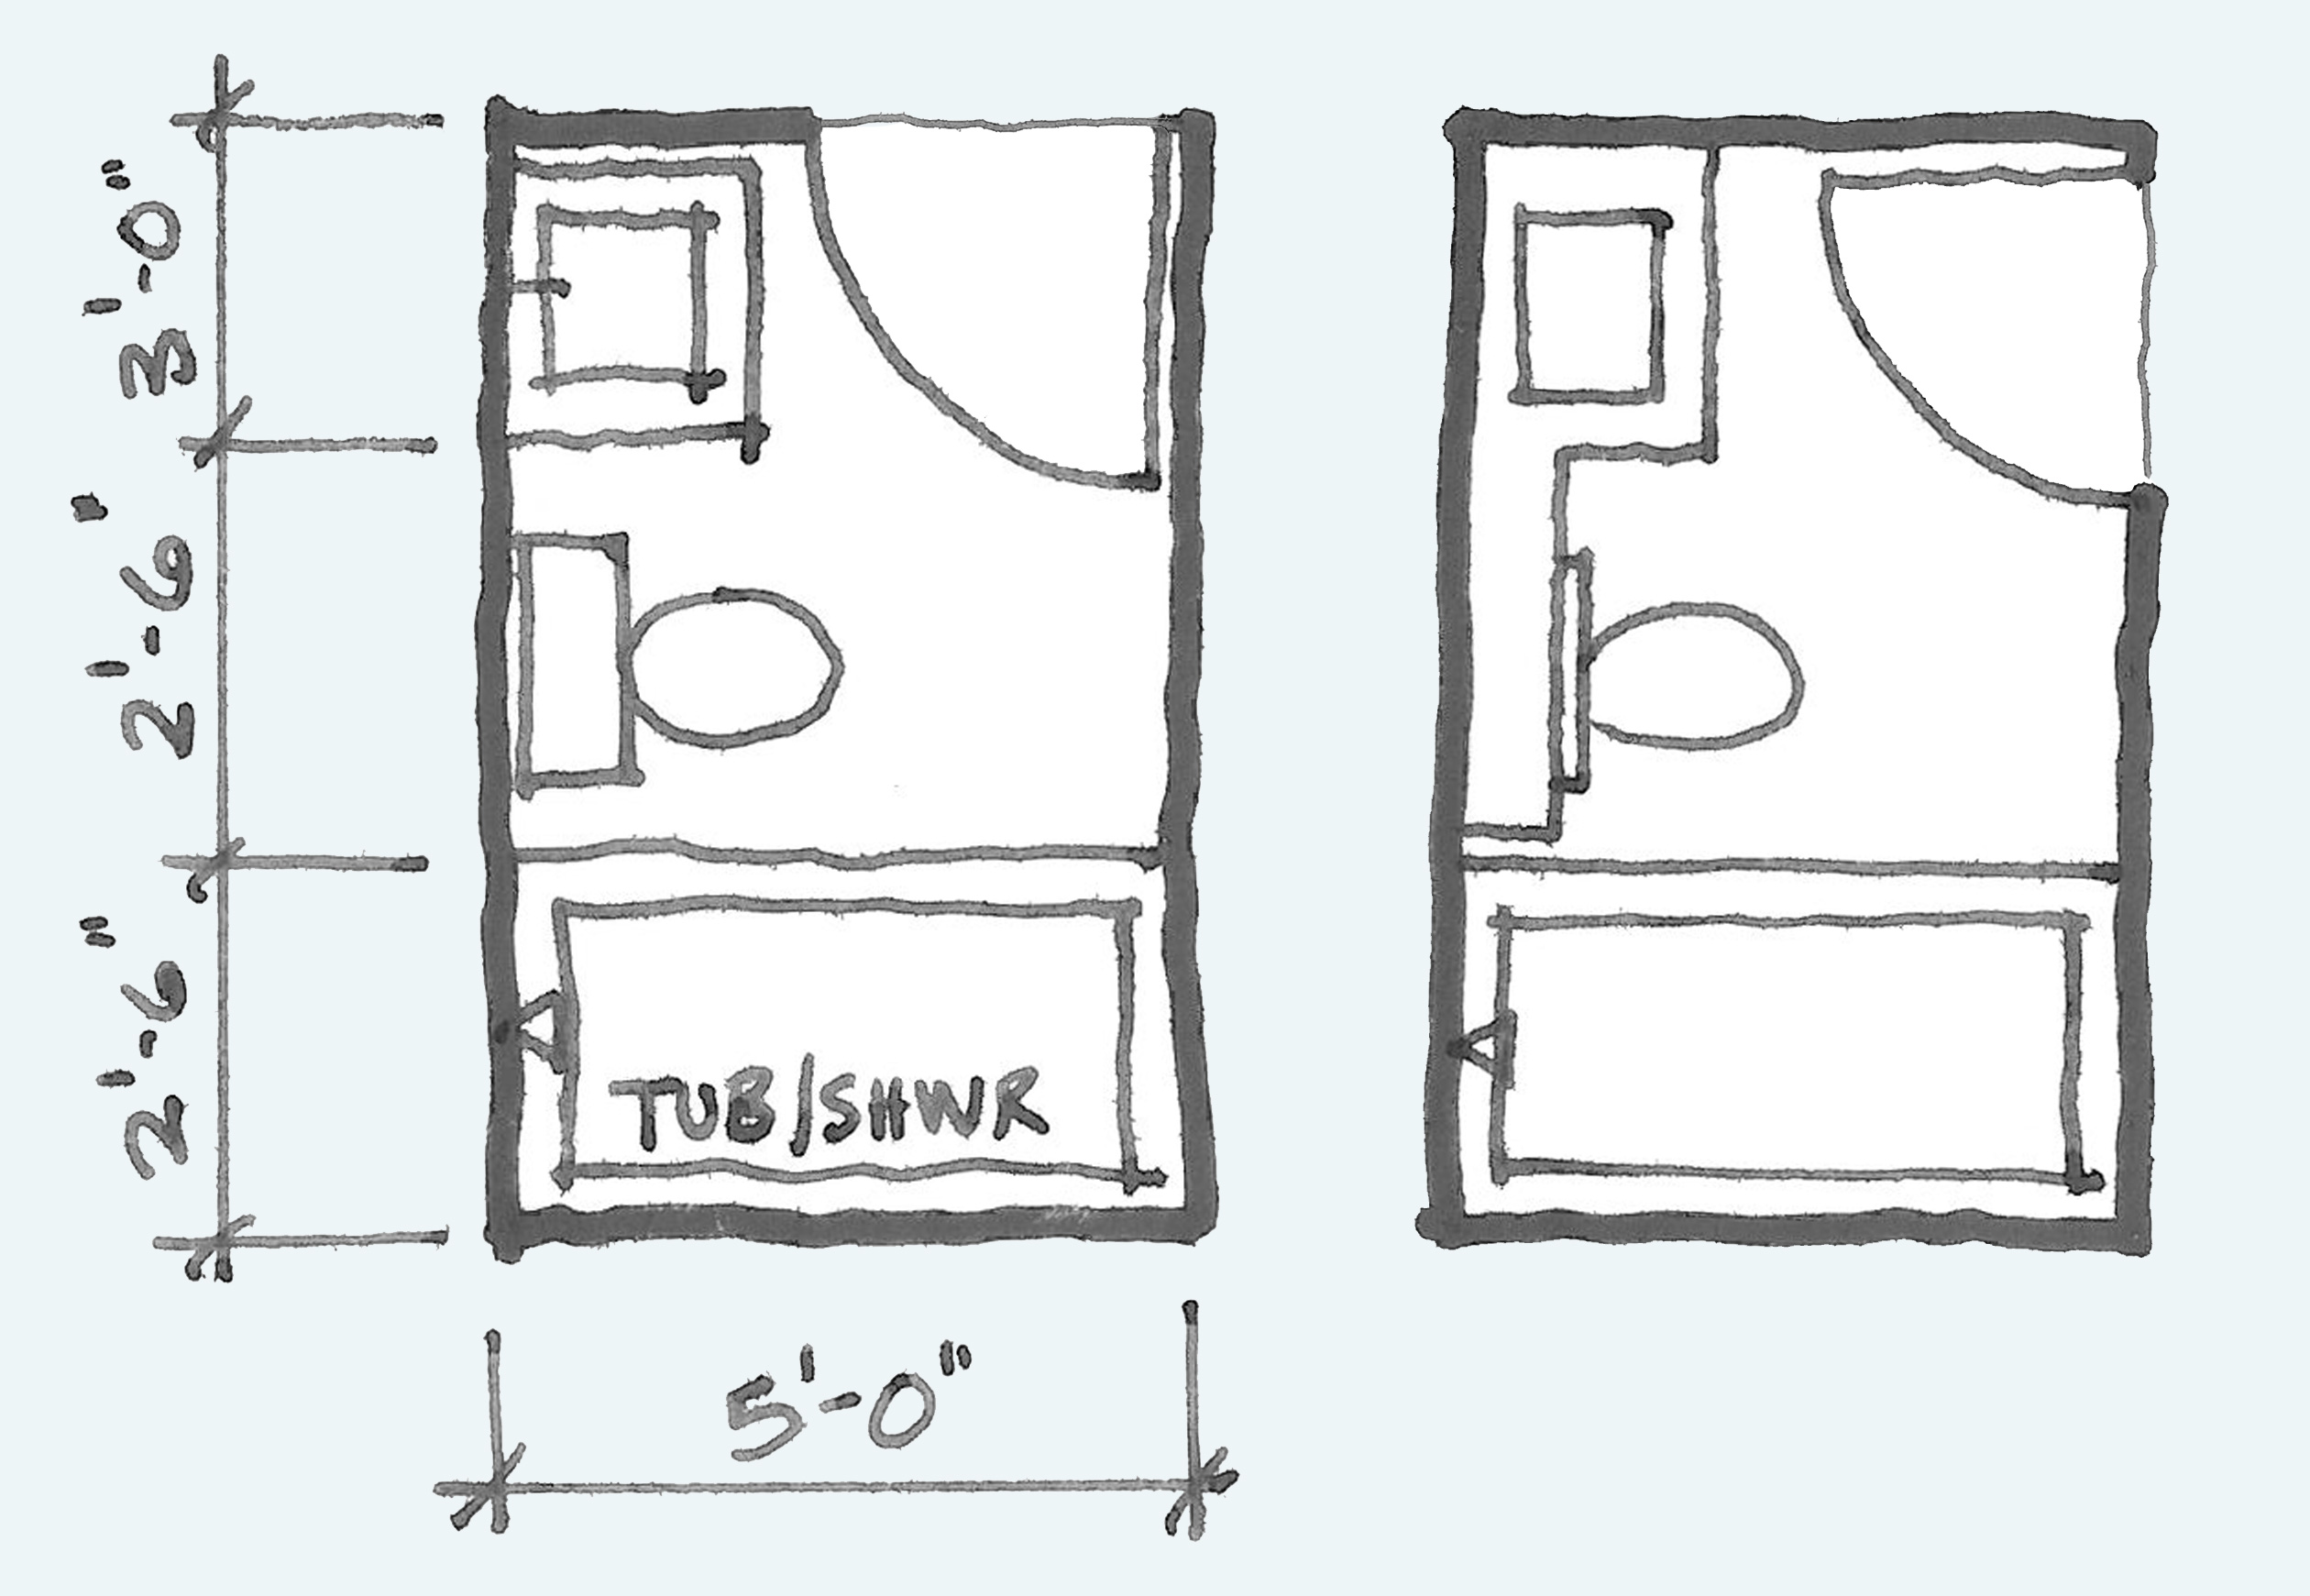
a. One-Wall Layout
Ideal for small bathrooms or powder rooms with limited space, the one-wall layout places all fixtures along a single wall. This layout maximizes floor space but may require careful planning to ensure efficient use of storage.
b. Galley Layout
Similar to a one-wall layout but with fixtures placed on opposite walls, the galley layout is ideal for narrow bathrooms. It provides a linear flow and allows for easy access to each fixture.
c. L-Shaped Layout
Perfect for medium-sized bathrooms, the L-shaped layout utilizes two adjacent walls to create an efficient space. This layout separates wet and dry areas, making it easier to organize your bathroom.
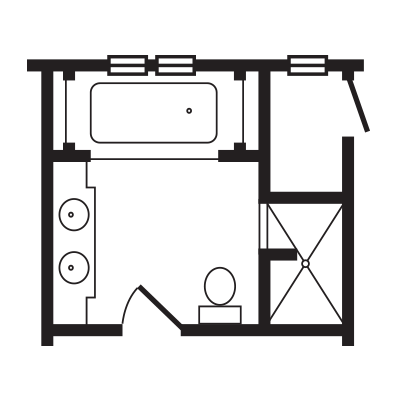
d. U-Shaped Layout
Ideal for larger bathrooms, the U-shaped layout features fixtures placed along three walls, forming a U-shape. This design provides ample storage and countertop space, making it perfect for families or those who desire a luxurious bathroom.
e. Wet Room Layout
A wet room layout offers a contemporary and open design concept where the entire bathroom doubles as a shower area. This layout is popular for its sleek appearance and accessibility features.
FAQ: How do I choose the right bathroom layout?
To choose the right bathroom layout, consider your personal preferences, available space, and budget. Think about how you will use the bathroom and prioritize functionality and convenience. It’s also essential to work with any existing plumbing connections to minimize costs.
3. Sketch Your Floor Plan
With the layout chosen, it’s time to sketch your bathroom floor plan. Start by drawing the outline of your bathroom on graph paper or using online floor planning tools. Use a scale of 1/4 inch per foot for accuracy. Begin by marking the location of doors, windows, and any existing plumbing connections.
Next, add fixtures such as sinks, toilets, showers, bathtubs, and cabinets to your floor plan. Ensure that you leave enough space around each fixture for comfortable movement and easy access. Consider clearances for doors swinging open, as well as any building Codes or regulations that may dictate minimum spacing requirements. Don’t forget to include any additional features you plan to add, such as towel racks, mirrors, or storage shelves.
4. Consider Accessibility and Universal Design
If you’re planning for a bathroom renovation or building a new bathroom, it’s essential to consider accessibility and universal design principles. This ensures that your bathroom is usable and safe for people of all ages and abilities. Some features to consider include:
a. Wheelchair Accessibility
If you or someone in your household uses a wheelchair, it’s important to ensure that the bathroom layout allows for easy movement and access. This may involve widening doorways, installing grab bars, and providing ample space in front of fixtures.
b. Non-Slip Flooring
Choosing non-slip flooring materials can help prevent accidents in the bathroom, especially for older adults or individuals with mobility challenges. Look for tiles or other options that provide traction even when wet.
c. Grab Bars and Handrails
Installing grab bars and handrails throughout the bathroom can provide added support and stability for individuals with limited mobility. These should be strategically placed near toilets, showers, and bathtubs.
d. Zero-Threshold Showers
Zero-threshold showers eliminate the need to step over a curb or raised edge, making them more accessible for individuals with mobility issues or those who use wheelchairs. They also create a seamless and modern look in the bathroom.
e. Adjustable Fixtures
Consider installing adjustable-height sinks, toilets, and showerheads to accommodate different users’ needs. This allows for flexibility and customization in the bathroom.
5. Seek Professional Help if Needed
If you’re unsure about the technical aspects of planning your bathroom layout or need assistance with plumbing or electrical considerations, don’t hesitate to seek professional help. A contractor or bathroom designer can provide expert guidance and ensure that your bathroom renovation or construction project meets all necessary requirements and codes.
Remember, careful planning and consideration of your needs and preferences are key to creating a functional and visually appealing bathroom layout. Take the time to measure accurately, consider different layout options, and prioritize accessibility features for a successful bathroom design project.