While it is correct that this type of floor has the important benefit of being simpler to clean in case the downstairs room floods and of trying to keep the basement cooler during the summer months, there are also several other aspects that you must take into account about cement flooring if you would like to change your basement into a leisure room.
Images about How To Install Shower Drain In Basement Floor
You might have never thought you would be ready to put a huge amount of notion in the color and decoration of your garage, but polyurea flooring enables you to do just that! The basement of yours or garage will be turned from filthy catch-all rooms to places that you are able to really feel satisfied of, and comfortable in. This makes it terrific for basements.
Installing a Curbless Shower on a Concrete Slab
That being the case, you will want to make certain that you choose the appropriate basement flooring alternative during the remodel of yours. Although there are certain floor coverings of preference for upstairs suites, you have for being a bit far more discerning in choosing those you put into the lower level of yours. With a good product you are going to have a waterproofed basement floor which should keep going for a number of years.
Moving a shower/bath drain in basement concrete
Shower drain flush with concrete floor- help! – Ceramic Tile
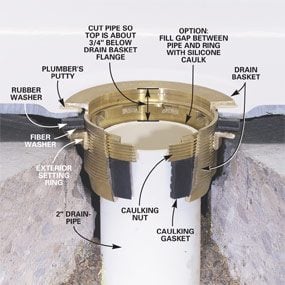
How to Install Shower Drain Pipe Part 1
How to Install a Shower Grate Concrete shower, Shower drain

shower drain concrete slab issue – DoItYourself.com Community Forums

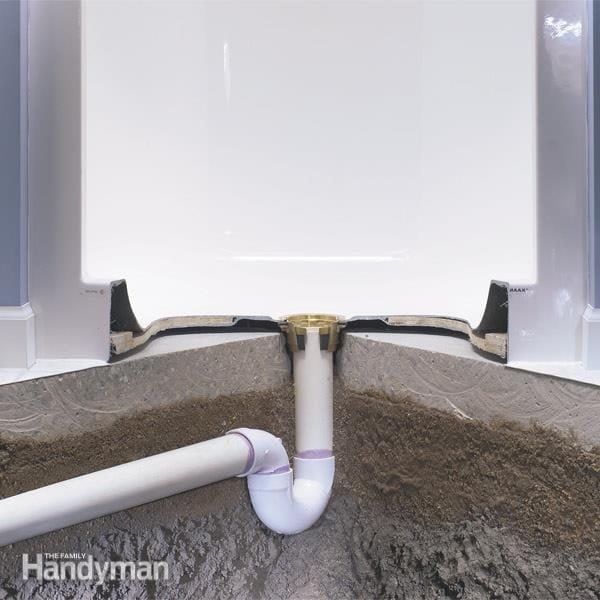
How to Install a Fiberglass Base Over Concrete (DIY) Family Handyman
How to install a shower drain in a cement floor
How to Install a Shower Drain
/installing-a-shower-drain-2718985-10-ec5a62cb896f482990b889780bb636e4.jpg)
How to level a concrete floor with self-leveling concrete

Plumbing Tips: Stop Shower Drain Pipe Breaks! Fill In Boxout
Can I Use a Basement Floor Drain for a Shower? u2013 HVAC-BUZZ

How to Install a Basement Bathroom – This Old House
/cdn.vox-cdn.com/uploads/chorus_asset/file/19498305/richard_basement_bath.jpg)
Related Posts:
- Drain In Basement Floor Has Water In It
- Capping Basement Floor Drain
- White Powder On Basement Floor
- Water Seeping Through Concrete Basement Floor
- DIY Basement Floor Ideas
- How To Install Porcelain Tile On Concrete Basement Floor
- Laminate Flooring Underlayment For Basement
- Drain Tile Under Basement Floor
- Basement Floor Paint Vs Epoxy
- Bungalow Floor Plans With Walkout Basement
Title: How to Install a Shower Drain in the Basement Floor: A Step-by-Step Guide
Introduction:
Installing a shower drain in the basement floor may seem like a daunting task, but with careful planning and the right tools, it can be a manageable DIY project. This article will guide you through each step of the installation process, providing detailed instructions and tips to ensure a successful outcome. So let’s dive in and learn how to install a shower drain in your basement floor!
I. Planning and Preparation:
Before starting any installation project, proper planning is essential. Here are some key considerations to keep in mind:
1. Determine the Drain Location:
Identify the ideal location for your shower drain based on the layout of your basement bathroom. Take into account factors such as proximity to existing plumbing lines and accessibility for future maintenance.
2. Choose the Right Shower Drain:
Selecting a suitable shower drain is crucial for ensuring proper water drainage and preventing leaks. Consider factors such as drain size, material (PVC or metal), and style (linear or traditional).
3. Gather the Necessary Tools and Materials:
To successfully install a shower drain in your basement floor, gather these essential tools and materials:
– Adjustable wrench
– Hacksaw or reciprocating saw
– Screwdriver
– Plumber’s putty
– PVC primer and cement
– Shower drain assembly kit
– Level
– Measuring tape
II. Installation Process:
Now that you have completed the planning phase, let’s move on to the step-by-step installation process:
1. Prepare the Basement Floor:
Clear the area where you plan to install the shower drain, ensuring it is clean and free from debris or obstructions.
2. Mark the Drain Location:
Using a measuring tape, mark the center point of your desired drain location on the basement floor.
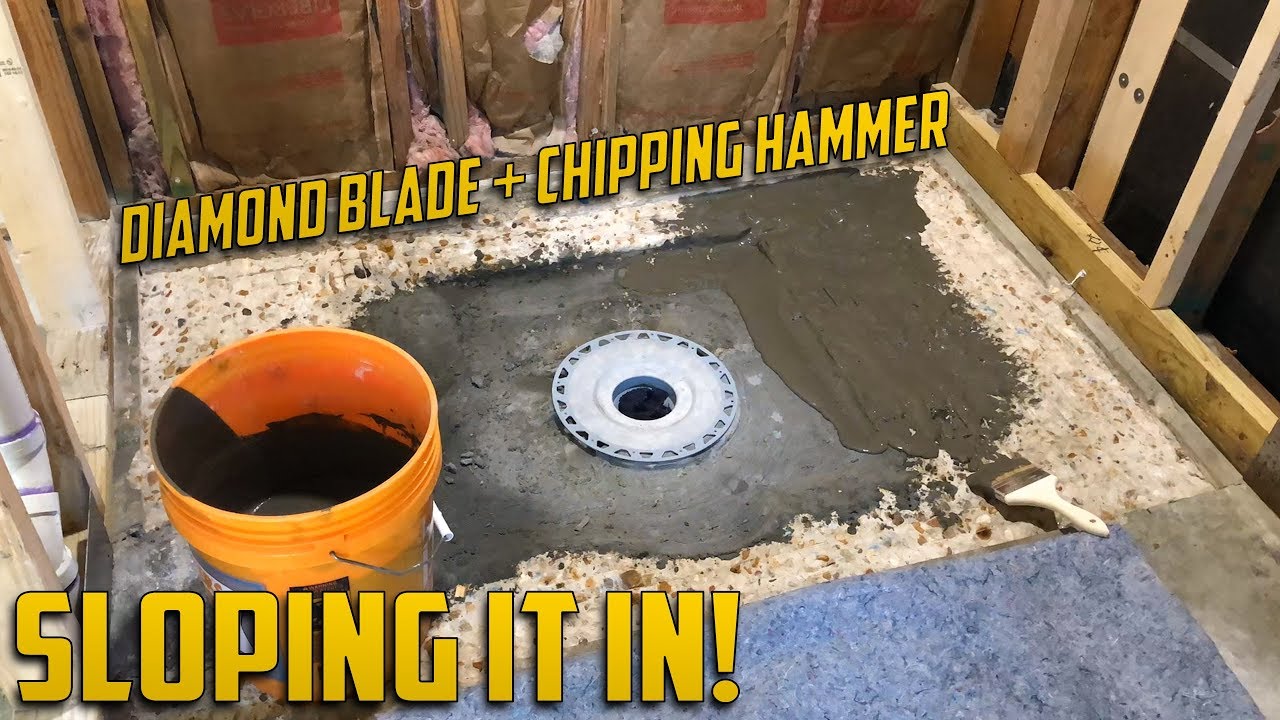
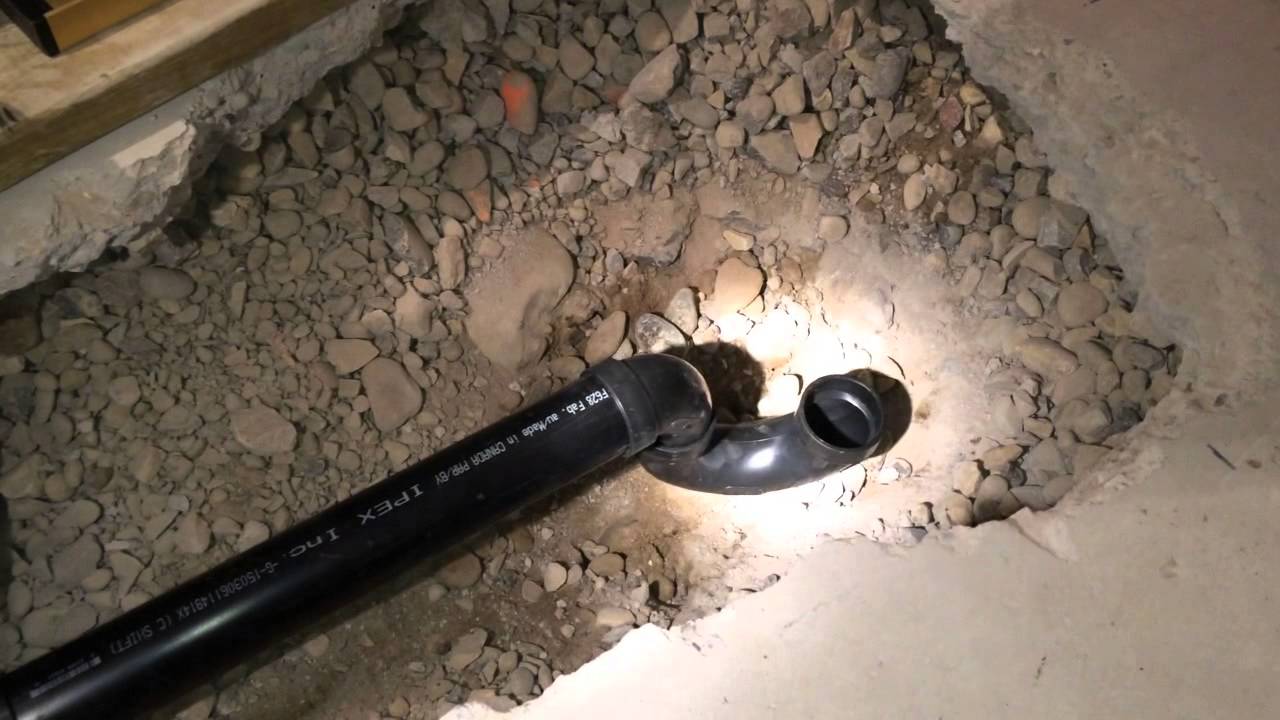
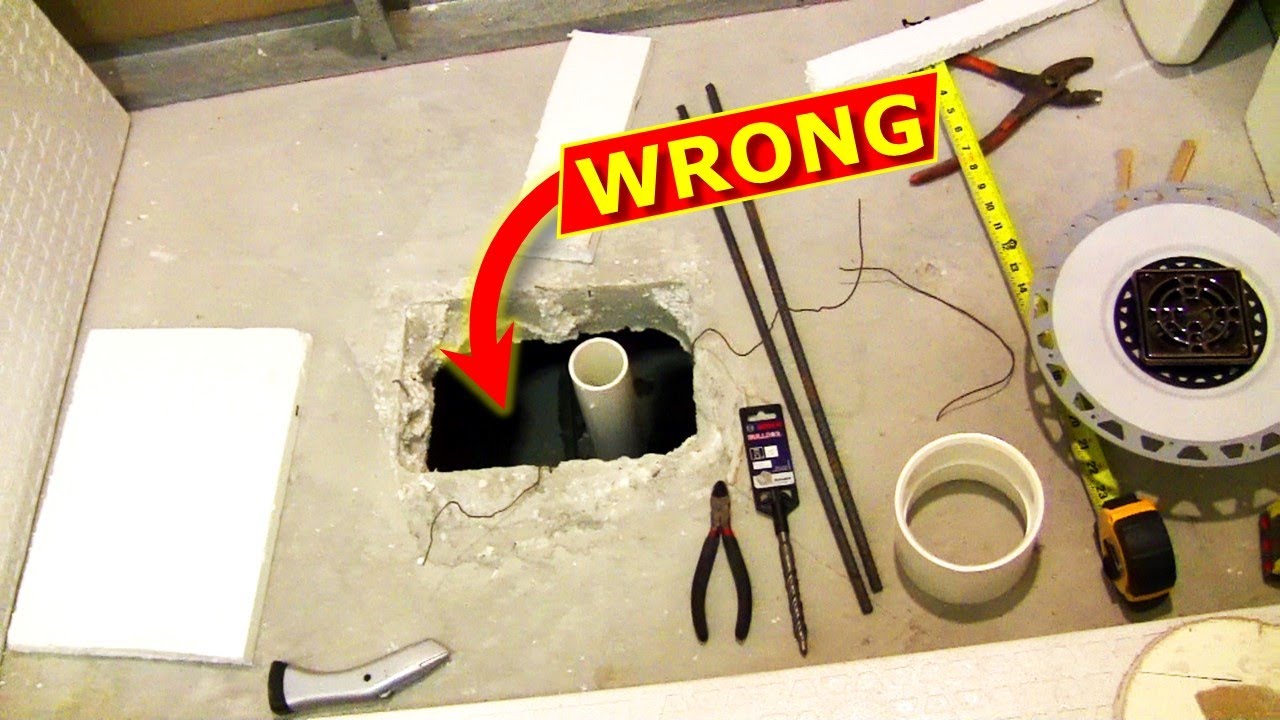
3. Cut an Opening for the Drain Pipe:
Using a hacksaw or reciprocating saw, carefully cut a hole in the basement floor, following the marked center point. Make sure the hole is slightly larger than the diameter of the drain pipe.
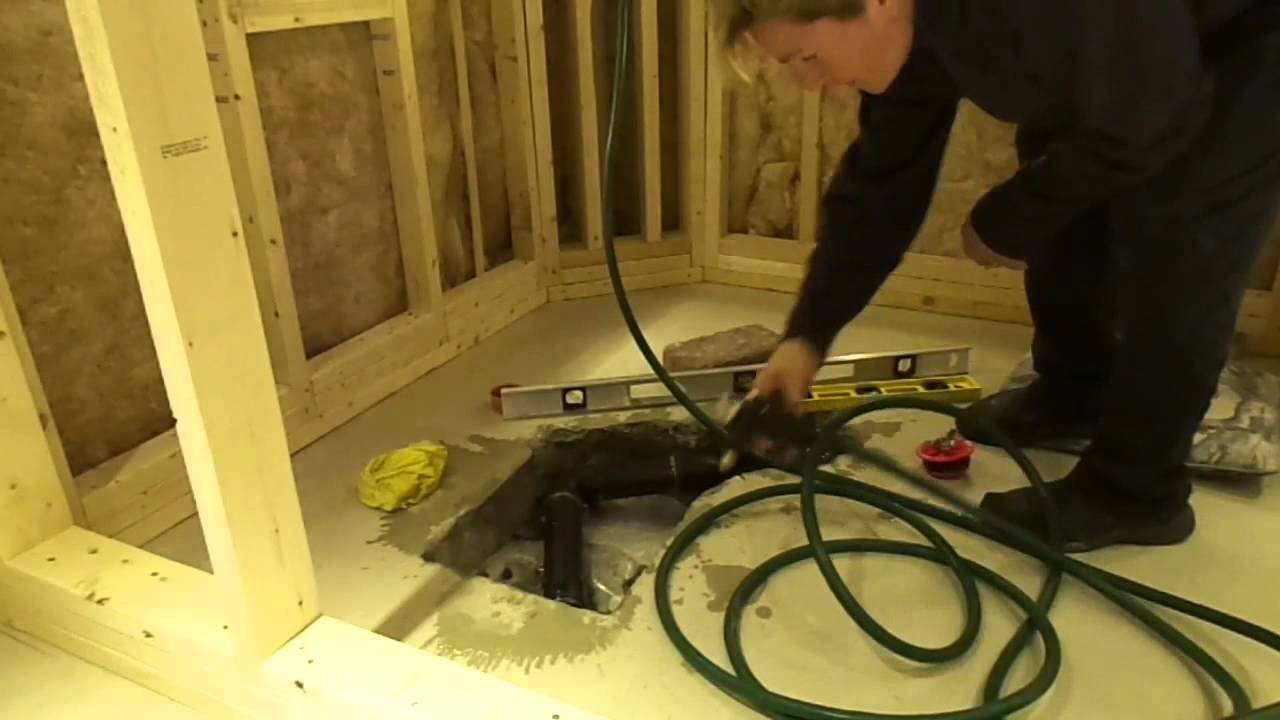
4. Install the Drain Pipe:
Insert the drain pipe into the hole, ensuring it fits snugly and securely. Apply plumber’s putty around the edges of the drain pipe to create a watertight seal.
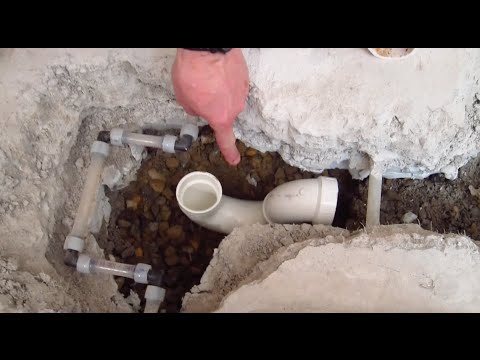
5. Connect the Drain Assembly:
Assemble the shower drain components according to the manufacturer’s instructions. Attach the drain body to the drain pipe, making sure it aligns properly. Use an adjustable wrench to tighten any necessary connections.
6. Test for Proper Alignment:
Place a level on top of the drain assembly to ensure it sits flush with the basement floor. Make any necessary adjustments to achieve proper alignment.
7. Secure the Drain Assembly:
Once satisfied with the alignment, secure the drain assembly in place using screws or clips provided with your kit. Be careful not to overtighten, as this may cause damage.
8. Connect to Plumbing Lines:
Connect the drain pipe from your shower base or bathtub to the bottom outlet of the installed drain assembly. Use PVC primer and cement to create a secure connection, following manufacturer guidelines.
9. Test for Leaks:
Before proceeding with further construction, test your newly installed shower drain for leaks by running water through it. Look for any signs of leakage around connections or within the basement floor.
III. Frequently Asked Questions (FAQs):
Q1: Can I install a shower drain in an existing basement floor without cutting into it?
A1: No , in order to install a shower drain in an existing basement floor, you will need to cut a hole in the floor to accommodate the drain pipe. This is necessary for proper installation and to ensure a watertight seal. Q2: What tools do I need to install a shower drain in a basement floor?
A2: Some of the tools you will need include a level, measuring tape, hacksaw or reciprocating saw, adjustable wrench, and PVC primer and cement for connecting plumbing lines.
Q3: How do I know if my shower drain is aligned properly?
A3: You can use a level to check if the drain assembly sits flush with the basement floor. If it is not aligned, you may need to make adjustments to achieve proper alignment.
Q4: How do I test for leaks in my newly installed shower drain?
A4: To test for leaks, run water through the drain and inspect for any signs of leakage around connections or within the basement floor. This will ensure that your installation is watertight and functioning properly. A question about installing a shower drain in an existing basement floor without cutting into it has been answered. The answer states that it is not possible to install a shower drain without cutting into the floor. Cutting a hole in the floor is necessary for proper installation and to ensure a watertight seal.
Another question asks about the tools needed to install a shower drain in a basement floor. The answer mentions some of the tools required, such as a level, measuring tape, hacksaw or reciprocating saw, adjustable wrench, and PVC primer and cement for connecting plumbing lines.
The next question inquires about how to know if a shower drain is aligned properly. The answer suggests using a level to check if the drain assembly sits flush with the basement floor. If it is not aligned, adjustments may need to be made for proper alignment.
The final question asks how to test for leaks in a newly installed shower drain. The answer advises running water through the drain and inspecting for any signs of leakage around connections or within the basement floor. This will ensure that the installation is watertight and functioning correctly.