Grout the ceramic tile flooring surfaces, and clean off any grout that gets on the tile. You are able to alter the complement tiles by removing it and buying new ones with the new ones. They need doubly strict a flooring as ceramic. To start off of all never use some type of abrasive since it could create scratches on the floor. The tiles could be snapped by hand or even with floor tile nippers, tile cutters or perhaps using a wet saw.
Images about Patching Grout Tile Floor
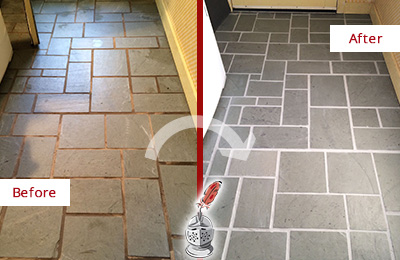
However you may be on a budget or even a passionate DIY wish as well as enthusiast would like to setup the tiles yourself, therefore check out this step by step guide to ceramic tile for the floor flooring set up. For daily washing, damp mopping does the trick. Cost of garage tile flooring can add up, that is among the drawbacks to this method. It can quickly alter the overall look of any floor.
How to Repair Cracked Tile Grout: An Easy Guide- The Lived-in Look

For all the options out there, you are going to find tile flooring that could be installed in any area of the home of yours. You are now all set to grout. Setting up a tile flooring isn’t extremely tough but does require a bit of perseverance as well as preparation. A massive amount folks wax them to keep them all the more protected. Porcelain and ceramic tiles are usually used in kitchens and bathtubs.
Fix Cracked u0026 Missing Tile Grout In A Few Easy Steps! Hometalk
How to Repair Grout Thatu0027s Cracking (DIY) Family Handyman
Fix Cracked u0026 Missing Tile Grout In A Few Easy Steps! Hometalk
Cracked or Broken Grout Signals a Bigger Problem – The Grout Experts

Can Grout Be Replaced?
Tile u0026 Grout Repair u0026 Regrouting Contour Cleaning

Can I put new grout over my old grout? The Grout Medic

How to Repair Cracked Tile Grout: An Easy Guide- The Lived-in Look

How To Grout Tile Repair Tile Grout Complete Grout Guide
How Do I Repair a Crack in Tile Grout? : Ceramic Tile Repair

Fix Cracked u0026 Missing Tile Grout In A Few Easy Steps! Hometalk
How to Repair Tile Grout Loweu0027s

Related Posts:
- How To Seal Travertine Tile Floor
- White And Grey Tile Floor
- Click Together Vinyl Tile Flooring
- Allure Gripstrip Resilient Tile Flooring
- Tile Floor Moulding
- What Kind Of Underlayment For Tile Floor
- Squeaky Bathroom Tile Floor
- Congoleum Commercial Tile Flooring
- Marble Look Ceramic Tile Flooring
- Pebble Rock Tile Flooring
Patching Grout Tile Floor
When the grout between tiles on your floor is damaged, it can look unsightly and cause water to seep into the gaps. Fortunately, patching grout tile floor is an easy do-it-yourself project that you can complete with just a few common tools and materials. In this article, we will provide a step-by-step guide to patching grout tile floor. We will also answer some of the most frequently asked questions about this simple task.
What You Will Need
Before you start patching grout tile floor, you will need to make sure that you have all of the necessary tools and materials. The most important items you will need are:
• Grout saw or oscillating multi-tool
• Grout float
• Utility knife
• Sponge
• Grout sealer
• Waterproof caulk
• Grout cleaner
• Bucket
• Chisel (optional)
• Drill (optional)
You may also want to purchase a grout colorant if the existing grout has faded and you want to make it look new again. Additionally, it’s important to remember that you should always wear protective gear such as goggles and gloves when handling any of these tools and materials.
Step-by-Step Guide to Patching Grout Tile Floor
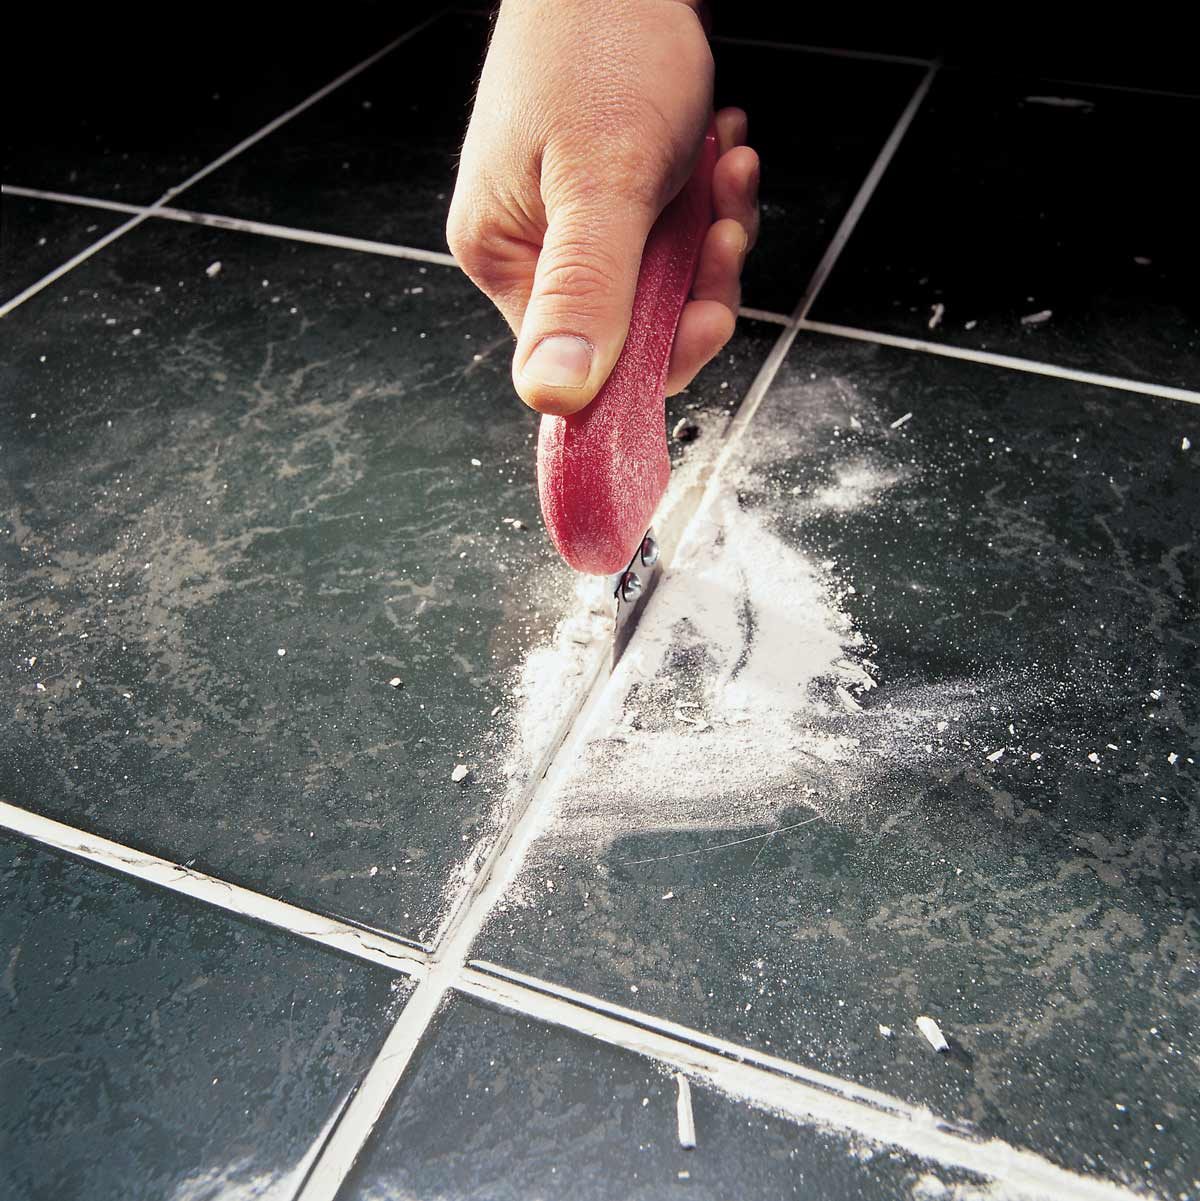
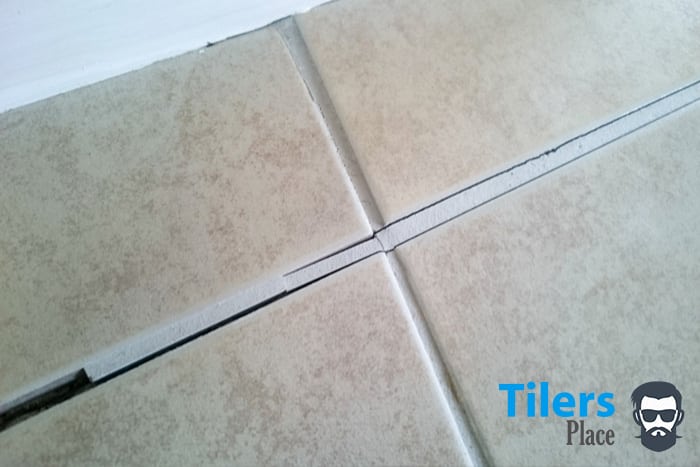
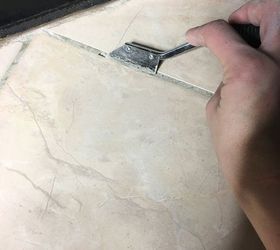
The first step in patching grout tile floor is to remove the existing grout from the affected area. This can be done with a grout saw or an oscillating multi-tool. You should also use a utility knife or chisel to remove any excess grout or caulk residue from the area. Once you have removed all of the existing grout, use a damp sponge to clean up any debris from the area.
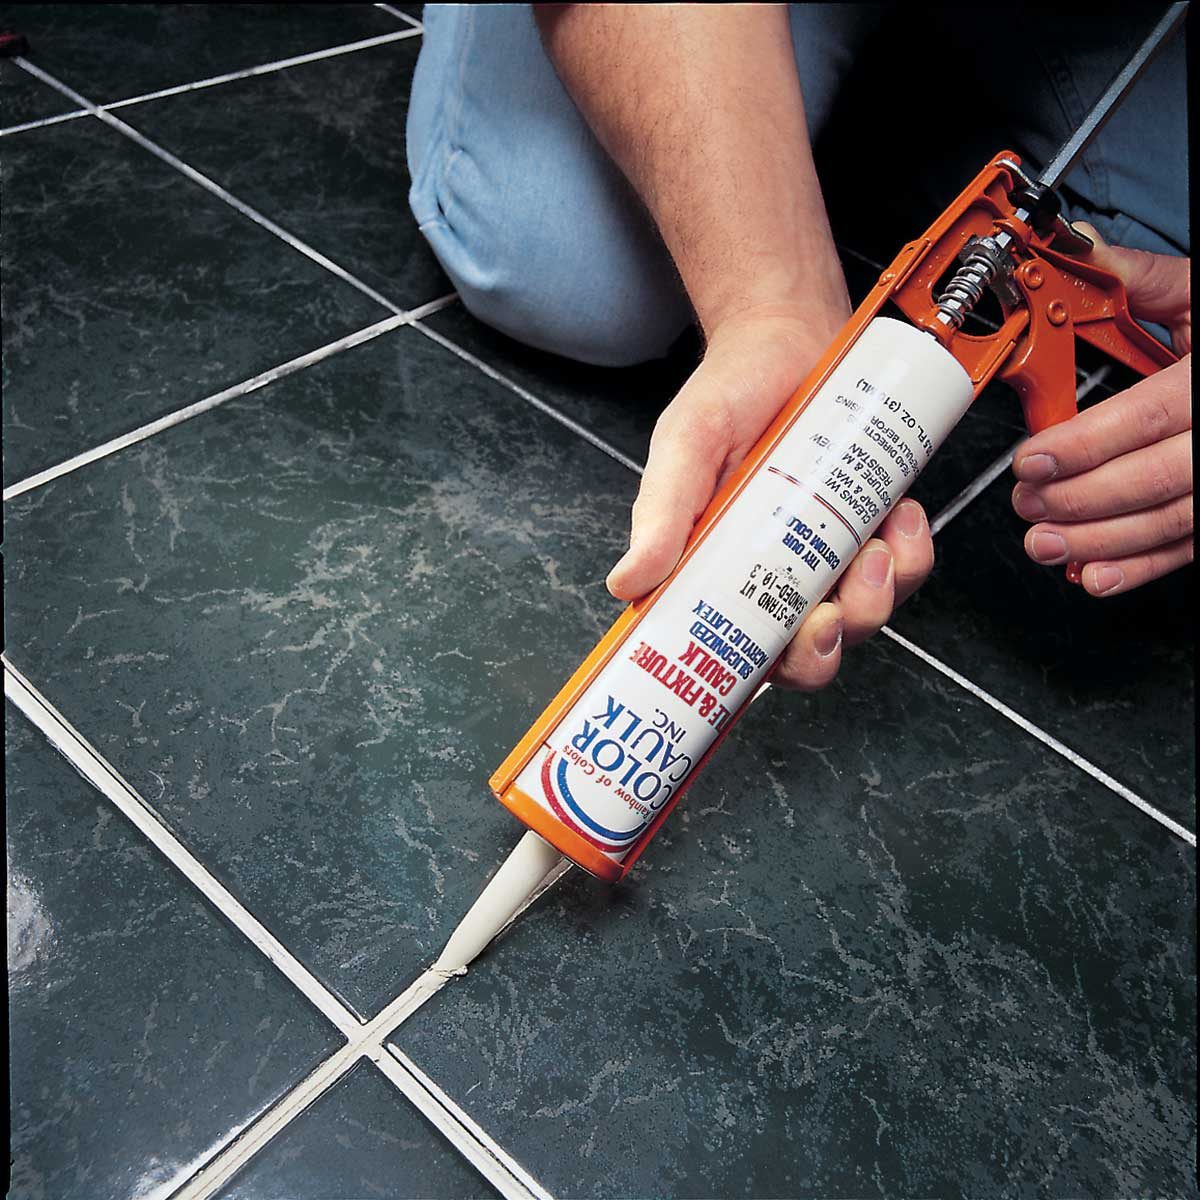
The next step is to apply a layer of waterproof caulk around the perimeter of the affected area. This will help ensure that water does not seep into the gaps between the tiles once the new grout has been applied. Once the caulk has been applied, allow it time to dry before proceeding with the next step.
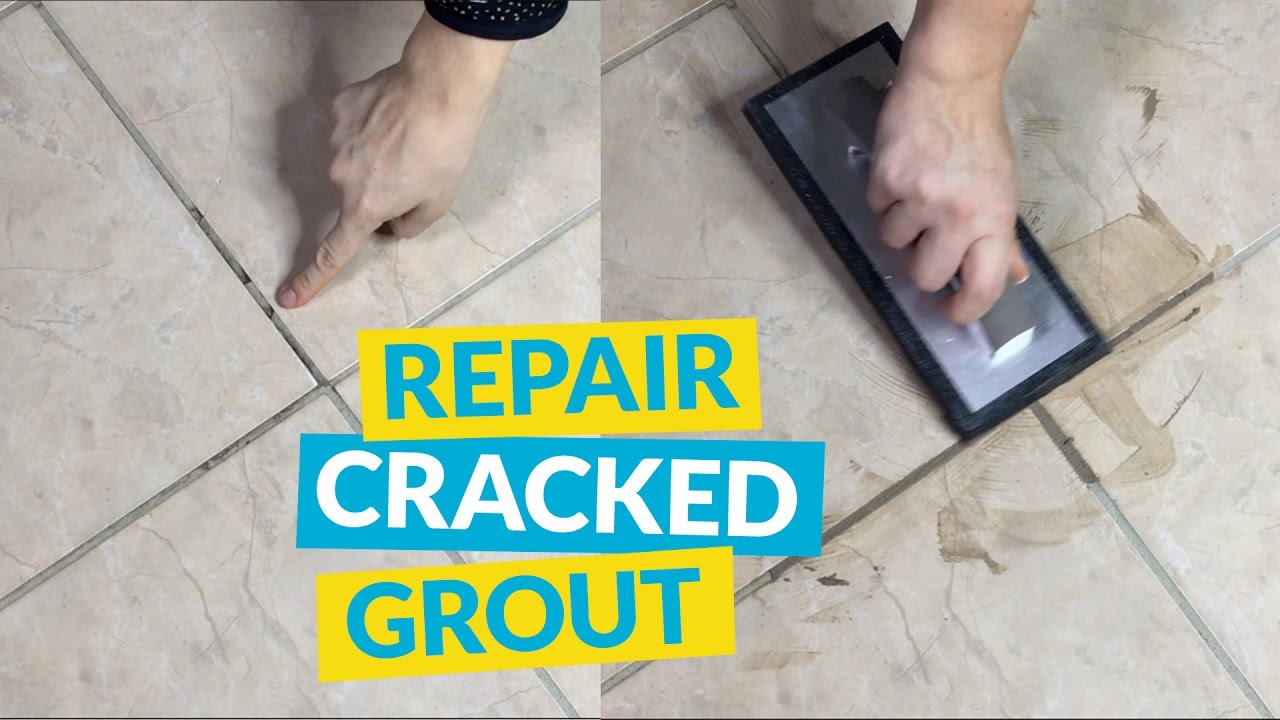
The third step is to mix up a batch of fresh grout according to the instructions on the package. Once mixed, use a grout float to apply it over the affected area and make sure that it is evenly distributed throughout all of the gaps between tiles. As with the caulk, allow time for this new grout layer to dry before proceeding with any further steps in your project.
The last step is to apply a layer of sealer over your new layer of grouts so that it won’t become stained or discolored in the future. Make sure that you read all instructions on your chosen sealer before applying it so that you get the best results possible.
With these simple steps, you can easily patch up any existing damage in your tile floor’s grouting and prevent any further water damage from occurring in your bathroom or kitchen space!
Frequently Asked Questions About Patching Grout Tile Floor
Q: What is the best way to remove existing grout?
A: The best way To remove existing grout is to use a grout saw or oscillating multi-tool. You can also use a chisel or utility knife to remove any excess grout or caulk residue.
Q: How long should I allow the new layer of grout to dry before applying sealer?
A: It is best to allow the new layer of grout at least 24 hours to dry before applying sealer. This will ensure that the sealer properly adheres to the grout and provides maximum protection.
What type of grout is best for patching tile floors?
The best type of grout to use for patching tile floors is epoxy grout. Epoxy grout is water-resistant, which makes it ideal for areas that are prone to moisture and humidity. It also offers superior strength and stability, which makes it less likely to crack or crumble over time.
What is the best way to patch a cracked tile floor?
The best way to patch a cracked tile floor is to use a flexible tile adhesive. First, clean the area around the crack and remove any debris or loose pieces. Then, apply the adhesive to the back of a piece of replacement tile and press it into place over the crack. Allow the adhesive to set according to the manufacturer’s instructions before walking on it.
What types of materials are best for patching a cracked tile floor?
The best materials for patching a cracked tile floor are epoxy mortar, tile adhesive, and grout. Epoxy mortar is a strong adhesive that will fill in cracks and permanently bond the tiles together. Tile adhesive is designed specifically for attaching tiles to a substrate and can also be used to fill in the cracks. Grout is a type of cement-based material that is used to fill in gaps between tiles and can also be used to patch cracks.
What tools are needed to patch a cracked tile floor?
-Hammer
-Chisel or tile scraper
-Caulk gun
-Tile adhesive
-Grout
-Bucket
-Sponge
-Grout sealer
-Protective eyewear
-Work gloves
-Dust mask
What is the best way to patch a cracked tile floor?
The best way to patch a cracked tile floor is to use a repair kit that contains two-part epoxy or an acrylic compound. First, clean and dry the area around the crack. Next, mix the two parts of the epoxy or acrylic compound according to the directions on the packaging. Carefully spread the mixture into the crack with a putty knife or other flat implement. Allow it to dry completely before walking on it.