All 3 could be fitted easily and inexpensively and are uncomplicated to maintain. Most guys as well as gals that focus on automobiles are really just concerned with getting it fresh. One other thing you are going to love to pick up when you work a lot in the garage of yours is the fact that a garage floor coating will be much easier to clean as opposed to the concrete itself.
Images about Garage Floor Preparation Before Painting
It is not really simple to put in, you've to be cautious about a couple of items before you get it, but in case you get it done correctly it will last for a while and it will shield the concrete wonderfully. Most of the on line websites will list companies carrying the floor and when you head to their sites, you are going to find a list of suppliers in your region.
How To Apply Commercial u0026 Garage Epoxy Floor Paint Coatings

Therefore, while this might be the cheaper initial option you should expect to refocu stains, paint or sealers occasionally. The friction free design that these floor mats have is great for shifting players. Epoxy paint demands all of the washing actions for great results, including acid etching.
Painting Your Garage Floors Dou0027s u0026 Dontu0027s! –

How to Prepare Concrete for Painting: 7 Critical Steps

How To Prep A Garage Floor For Epoxy Coating Floor Shields

How to Paint a Garage Floor – Clean and Scentsible

The Best Way To Paint A Garage Floor (Non-slip)
Surface Preparation in Epoxy Flooring: Explaining the different

How to Paint a Garage Floor (Project Summary) – Bob Vila

Painting Your Garage Floors Dou0027s u0026 Dontu0027s! –
How to Prepare Concrete for Painting: 7 Critical Steps
How to Paint a Garage Floor – Clean and Scentsible
How to Prep a Garage Floor For Epoxy – Home Stratosphere

Painting Concrete Floors? Follow These 3 Key Steps – Bob Vila

Related Posts:
- Garage Floor Paint Colours
- Oil Off Garage Floor
- Waterproofing A Garage Floor
- Garage Floor Anchor Pots
- Custom Garage Floor Coating
- Pictures Of Garage Floor Epoxy
- Metallic Epoxy Garage Floor Cost
- Garage Floor Vinyl Rolls
- Garage Floor Paint Dry Time
- Concrete Garage Floor Cost Per Square Foot
Title: Garage Floor Preparation Before Painting: A Comprehensive Guide
Introduction:
Painting your garage floor can transform the space from a dull and dirty area into a clean, attractive, and functional part of your home. However, before you dive into the painting process, it is crucial to prepare the garage floor properly. Garages are subjected to heavy foot and vehicle traffic, making it essential to ensure a solid foundation for long-lasting results. In this article, we will guide you through the step-by-step process of garage floor preparation before painting, providing you with all the necessary information to achieve professional-looking results.
I. Clearing and Cleaning the Garage Floor:
Before any painting can take place, it is essential to clear out the garage completely and remove any items or debris that might hinder the cleaning process. Sweep thoroughly to eliminate loose dirt and dust particles from the surface. Use a shop vacuum to remove any residual dust or debris from corners and hard-to-reach areas.
Next, prepare a cleaning solution by mixing warm water with a suitable concrete cleaner according to the manufacturer’s instructions. Apply the cleaner generously over the entire garage floor surface using a stiff bristle brush or a push broom. Scrub vigorously to ensure all stains, oil spots, and grime are removed effectively.
FAQs:
Q1: Can I use regular household cleaners instead of concrete cleaners?
A1: It is recommended to use specialized concrete cleaners as they are formulated specifically for removing ingrained dirt and oil stains from concrete surfaces. Regular household cleaners may not provide satisfactory results.
Q2: How do I deal with stubborn stains on my garage floor?
A2: For tough stains such as oil spills or grease marks, you can use a degreaser specifically designed for concrete surfaces. Apply the degreaser directly on the stain, let it sit for a few minutes, then scrub with a stiff brush before rinsing thoroughly.
II. Repairing Cracks and Imperfections:
Inspect the garage floor closely for any cracks, pits, or imperfections. These blemishes can affect the adhesion of the paint and undermine the final finish. To ensure a smooth and even surface, repair any visible damage using a suitable concrete patching compound.
Carefully follow the instructions provided by the manufacturer to mix the patching compound correctly. Apply the compound to the cracks or imperfections using a trowel or putty knife, ensuring it is spread evenly and slightly raised above the floor surface. Allow it to dry completely as per the manufacturer’s guidelines before moving on to the next step.
FAQs:
Q1: How long does it take for concrete patching compounds to dry?
A1: Drying times can vary depending on factors such as temperature and humidity levels. Typically, it takes around 24 hours for the compound to dry completely. It is best to refer to the specific drying times mentioned on the product packaging.
Q2: Are there any alternatives to concrete patching compounds?
A2: In some cases, small cracks or imperfections can be filled with epoxy crack fillers or self-leveling compounds. However, for larger cracks or extensive damage, it is recommended to consult a professional contractor for proper repairs.
III. Etching the Garage Floor:
Etching is a crucial step in garage floor preparation as it helps create a porous surface that allows paint to adhere effectively. Etching also removes any remaining dirt, oil residues, or sealers that may hinder paint adhesion.
To etch your garage floor , you will need to follow these steps:
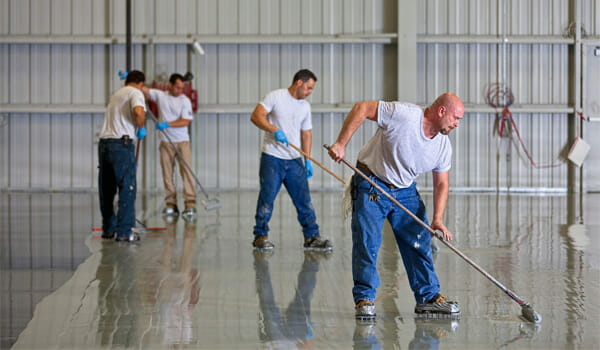
1. Start by thoroughly cleaning the garage floor using a suitable concrete cleaner and a stiff bristle brush or push broom. This will remove any loose dirt or debris.
2. Rinse the floor with clean water to remove any residue from the cleaning solution.
3. Mix an etching solution according to the manufacturer’s instructions. This is typically a mixture of water and muriatic acid or a commercially available etching product.
4. Apply the etching solution to the garage floor using a watering can or sprayer. Make sure to wear protective gloves, goggles, and clothing to avoid any contact with the solution.
5. Use a stiff bristle brush or a mechanical scrubber to scrub the solution into the floor surface. This helps ensure thorough coverage and effective etching.
6. Allow the etching solution to sit on the floor for the recommended amount of time, usually around 10-15 minutes. This allows it to react with the concrete and break down any remaining contaminants.
7. Rinse the floor thoroughly with clean water to neutralize and remove the etching solution.
8. Use a wet vacuum or mop to remove any excess water from the floor surface.
9. Allow the floor to dry completely before proceeding with painting or applying any coatings.
FAQs:
Q1: Can I skip the etching step and directly apply paint or coating to my garage floor?
A1: It is highly recommended not to skip the etching step as it plays a crucial role in ensuring proper adhesion of paint or coatings. Skipping this step may result in poor bonding and premature peeling or chipping of the paint.
Q2: Can I use a pressure washer instead of scrubbing with a brush for etching?
A2: While a pressure washer can be used to rinse off the etching solution, it is not recommended as the sole method for applying the solution. Scrubbing with a brush helps ensure better coverage and allows the solution to penetrate the concrete surface more effectively.