The issue is most people do not take the time to read the warranty and are surprised every time they find out the matter they are having with the flooring is one of the “exclusions”. Installation of most engineered hardwood floors are actually carried out by the glue down or even floating floor technique. You are able to also check the internet for most helpful info like the hardness scale for specific wood flooring species.
Images about Hardwood Flooring Installation Checklist

Before purchasing hardwood floor, you ought to contemplate for which part of the home of yours you are getting the wood. Hardwood floors are among the most important style components you can have in any home or office. Maunufacturers specifications must be followed explicitly. It’s safer to use vacuum cleaners compared to sweeping and scrubbing.
National Wood Flooring Association/Hardwood Floors Magazine – Have

Regular family dusting and cleaning solutions will cause you, however, and damage must use just products specially made for hardwood. One of the biggest improvements that the majority of home owners do to their floors is to refinish them. Apart from being beautiful and hardwearing, hardwood floor surfaces are eco-friendly.
Nash Timbers Installation Checklist

Professional Hardwood Flooring Checklist – Trademark Floors
Laminate Flooring Installation Checklist : r/homedesign

Nash Timbers Installation Checklist

Success Checklist DIY Flooring OnFlooring

Flooring Frequently Asked Questions

Hardwood Flooring Installation Phoenix

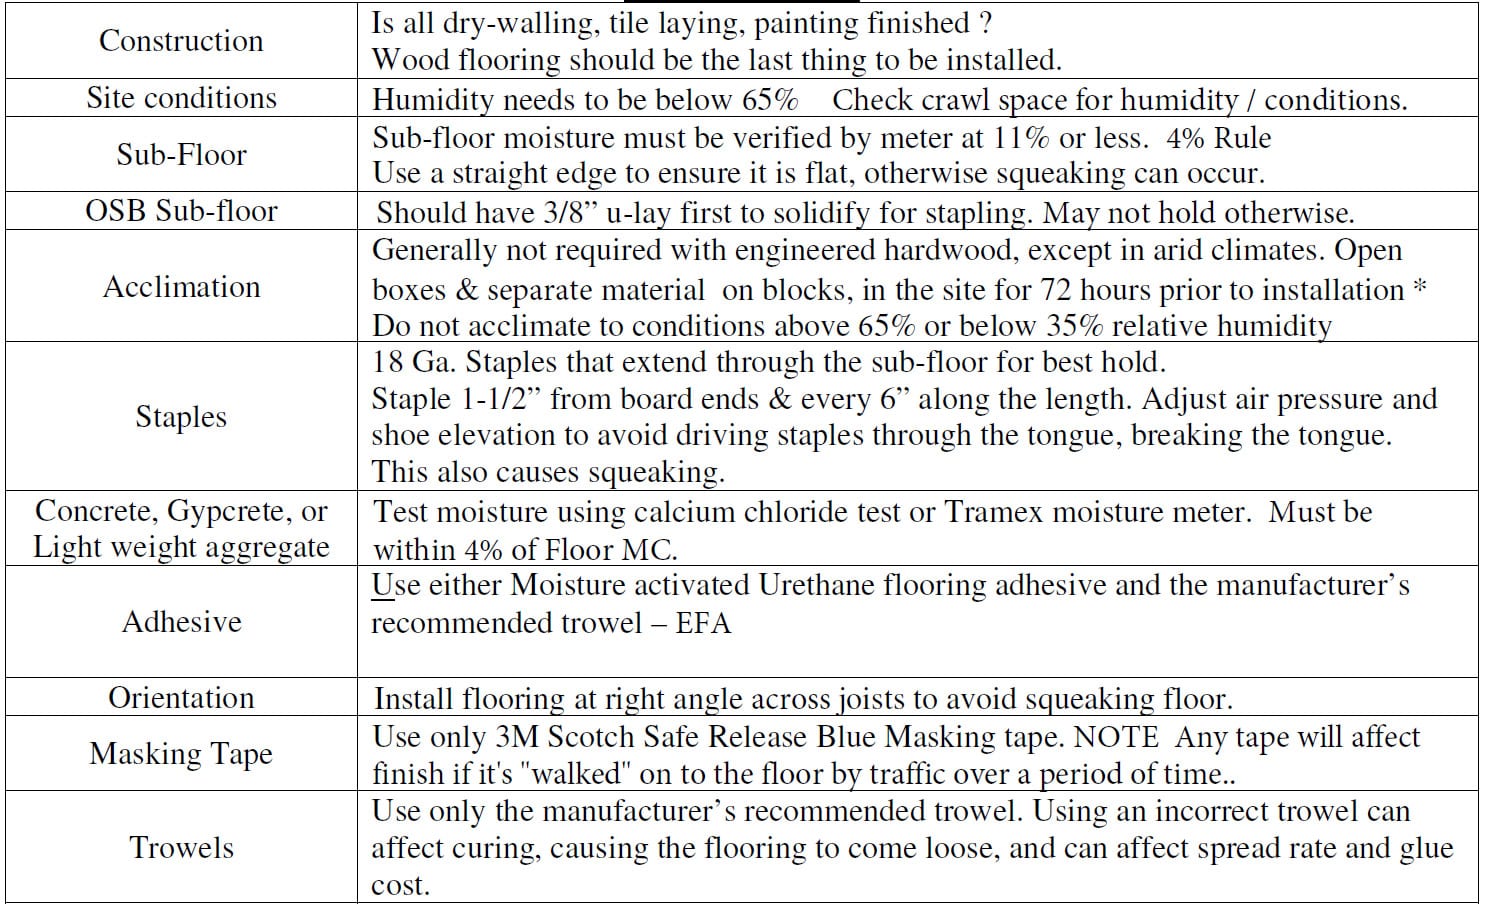
New Floor Survival Guide u0026 Installation Checklist LIFECORE Flooring
Checklist For Engineered Hardwood Flooring Installation

Flooring Installation Ultimate Checklist – Twenty u0026 Oak
Laminate Floor Installation Checklist
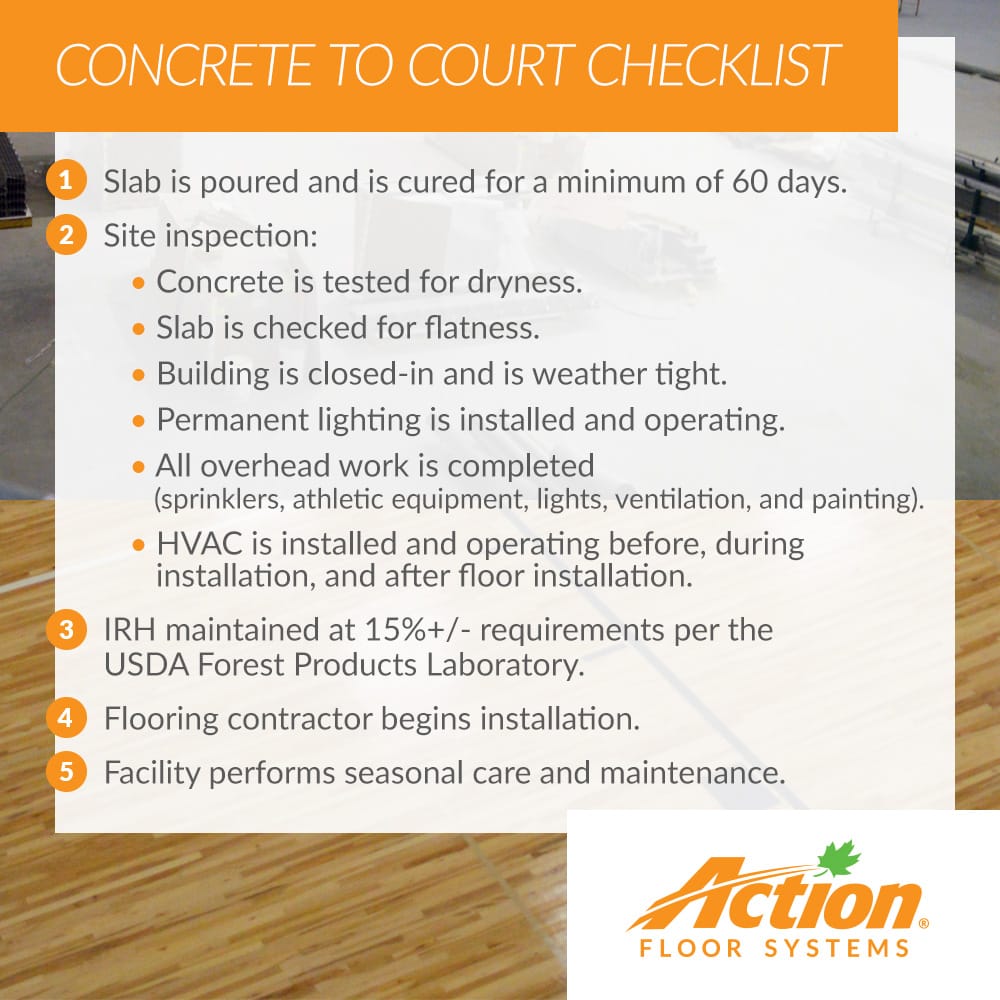
Preparing for Hardwood Sports Floor Install Action Floors
Related Posts:
- Hardwood Floor Stain Grey
- Exotic Hardwood Flooring Types
- Dubeau Hardwood Flooring Reviews
- Hickory Tuscany Hardwood Flooring
- Quick Step Hardwood Flooring Reviews
- Discontinued Hardwood Flooring Sale
- White Oak Select Hardwood Flooring
- Hardwood Floor Finishing Costs
- Hardwood Flooring With Installation Cost
- Vanier Engineered Hardwood Flooring Reviews
Hardwood Flooring Installation Checklist
Installing hardwood flooring can be a significant investment in your home. It not only enhances the aesthetic appeal of your space but also adds value to your property. However, proper installation is crucial to ensure that you achieve the desired results and avoid any potential issues down the line. To help you through the process, we have created a comprehensive hardwood flooring installation checklist. This checklist covers all the essential steps and considerations you need to keep in mind before, during, and after the installation.
1. Pre-Installation Preparation:
Before diving into the installation process, it’s important to take some time for pre-installation preparation. This step ensures that you have everything in order and helps minimize any potential hiccups during the installation.
a) Acclimate the Flooring: One of the most critical steps in preparing for hardwood flooring installation is acclimating the planks to their new environment. This involves storing the planks inside your home for a specific period before installation. The purpose of acclimation is to allow the flooring to adjust to the temperature and humidity levels of your space, preventing issues like warping or buckling later on.
FAQ: How long should I acclimate my hardwood flooring?
Answer: The duration of acclimation varies depending on factors such as the species of wood, width of planks, and environmental conditions. Typically, hardwood flooring should be acclimated for a minimum of 48 hours up to a week.
b) Prepare Subfloor: The subfloor is an integral part of ensuring a successful hardwood flooring installation. It must be clean, dry, level, and structurally sound. Remove any existing floor coverings, debris, or adhesives from the subfloor surface. Additionally, check for any squeaks or loose boards and make necessary repairs before proceeding with installation.
FAQ: Can I install hardwood flooring over an existing floor?
Answer: In most cases, it’s possible to install hardwood flooring over an existing floor. However, it’s important to ensure that the subfloor is in good condition and meets the installation requirements of the new hardwood flooring. Consulting with a professional installer can help determine if your existing floor is suitable for hardwood installation.
2. Gathering Tools and Materials:
Having the right tools and materials on hand is crucial for a smooth and efficient hardwood flooring installation. Here are some essential items you will need:
a) Flooring Materials: Purchase high-quality hardwood flooring that suits your style preferences and matches the requirements of your space. Consider factors such as wood species, plank width, finish type, and durability.
b) Installation Tools: Some common tools required for installing hardwood flooring include a tape measure, chalk line, circular saw or miter saw, pneumatic nailer or stapler, pry bar, tapping block, rubber mallet, and a moisture meter.
c) Additional Materials: Along with the flooring materials and installation tools, you may need additional supplies such as underlayment, adhesive (if using glue-down method), transition strips, trim pieces, and moisture barrier.
FAQ: Do I need a moisture barrier for hardwood flooring?
Answer: While not always necessary, using a moisture barrier is highly recommended to prevent any moisture-related issues. A moisture barrier helps protect the hardwood flooring from moisture that may seep through the subfloor. It is particularly important when installing over concrete slabs or in areas prone to high humidity levels.
3. Installation Methods:
There are different methods available for installing hardwood flooring. The choice of installation method depends On factors such as the type of hardwood flooring, subfloor condition, and personal preference. Here are three common installation methods:
a) Nail/Staple Down: This method involves using nails or staples to secure the hardwood flooring directly to the subfloor. It is commonly used for solid hardwood flooring and requires a plywood or oriented strand board (OSB) subfloor.
b) Glue-Down: In this method, adhesive is applied to the subfloor and the hardwood flooring is glued down. It is suitable for both solid and engineered hardwood flooring and can be used on various subfloor types, including concrete.
c) Floating: The floating installation method involves attaching the hardwood flooring together using a tongue-and-groove system, without any attachment to the subfloor. This method is commonly used for engineered hardwood flooring and can be installed over various subfloor types.
It is important to follow manufacturer instructions and consult with a professional installer to determine the most suitable installation method for your specific situation.
4. Installation Process:
a) Prepare the First Row: Start by removing any baseboards or moldings. Measure and cut the first row of hardwood flooring planks to fit along the starting wall, leaving a 1/2-inch gap for expansion.
b) Install the First Row: Apply adhesive (if using glue-down method) or use nails/staples to secure the first row of planks to the subfloor. Use a tapping block and rubber mallet to ensure they are tightly fitted together.
c) Continue with Subsequent Rows: Install subsequent rows by interlocking the tongue-and-groove edges of the planks. Stagger the end joints for a more visually appealing result. Use a pneumatic nailer/stapler or adhesive as needed.
d) Trim and Finish: Once all planks are installed, trim any excess material along walls or doorways using a circular saw or miter saw. Install baseboards or moldings to cover expansion gaps. Finish the hardwood flooring according to manufacturer instructions, which may include sanding, staining, and applying a protective finish.
5. Maintenance and Care:
a) Regular Cleaning: Sweep or vacuum the hardwood flooring regularly to remove dirt and debris. Use a hardwood floor cleaner recommended by the manufacturer for deeper cleaning.
b) Preventative Measures: Place mats at entryways to trap dirt and moisture. Use furniture pads to prevent scratches from furniture legs. Avoid wearing high heels or walking on the hardwood flooring with sharp objects.
c) Moisture Control: Maintain a consistent indoor humidity level of 35-55% to prevent excessive expansion or contraction of the hardwood flooring. Clean up any spills immediately to prevent water damage.
d) Refinishing: Over time, hardwood flooring may show signs of wear and tear. It can be refinished by sanding down the surface and applying a new finish to restore its appearance.
Regular maintenance and proper care will help prolong the lifespan and beauty of your hardwood flooring.