However, seamless epoxy flooring gives you many benefits in a cost highly effective way. Concrete is actually porous which enables it to soak up dirt, salt, oils and chemicals, making it tough to clean the concrete floors properly. It remains to become one of the most sought after coatings methods which meet any kind of coatings program requirements. There's no problems with concrete dust, and also cleaning is also easy.
Images about Hardcoat Epoxy Garage Floor Kit

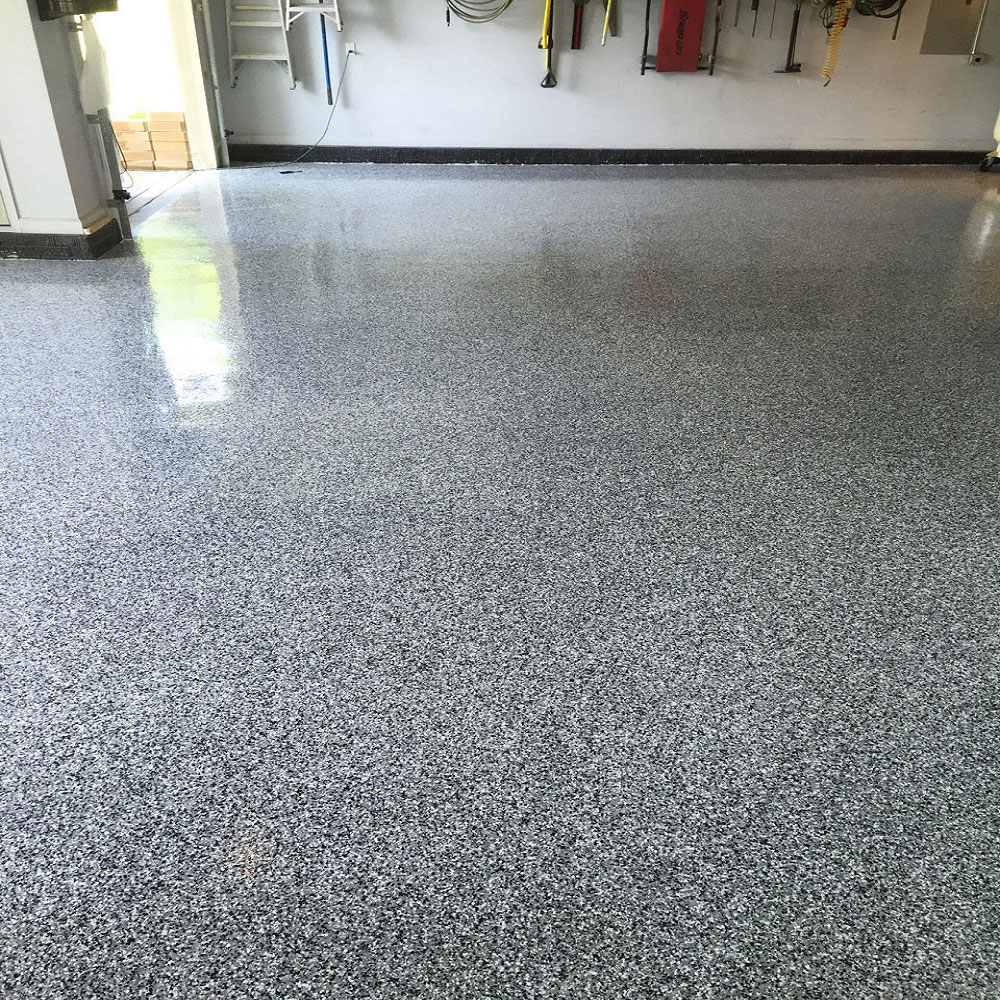
Epoxy adheres very well to surfaces manufactured from concrete, metal, tiles, wood, and more. Epoxy provides floors a glossy, glassy appearance which tends to make the whole area vibrantly stand out in phrases of high end aesthetic appearance and appeal. It need to have an epoxy resin, a clear or amber viscous liquid. The floors of yours will always be in great shape. Anti-slip flecks are made of acrylic and also provide a decorative touch to an epoxy flooring.
ARMOR CHIP GARAGE EPOXY FLOORING KIT

Epoxy covering in addition minimizes the need to continually wash the floors because epoxy repels and also stops spills and other contaminants from moving into the concrete. This expansion forms a heavy screen protection which lasts long enough for your fire being put out organically or even by a responding fire fighting team. An epoxy flooring beautifies some space, adding value to the residence of yours, shop or restaurant.
ARMOR CHIP GARAGE EPOXY FLOORING KIT

Epoxy flooring coloring is incredibly cost-effective. You are able to only a mild combination for a surface that has to have a light coating only. So far as the durability is concerned the epoxy surface paint seems to be the most dependable option which comes ahead. This blend also changes the porous properties of floor and creates a non porous concrete area.
ARMOR CHIP GARAGE EPOXY FLOORING KIT

ARMOR CHIP GARAGE EPOXY FLOORING KIT

ARMOR CHIP GARAGE EPOXY FLOORING KIT

Epoxy Floor Coating Kit Garage Paint Concrete Sealer – $799.87
Garage Floor Epoxy Kit – High Solids System – 1 Car Garage

BEAUTI-TONE HARDCOAT EPOXY GARAGE FLOOR KIT

Rust-Oleum EpoxyShield 90 oz. Clear High-Gloss 2-Part Epoxy
![]()
ARMOR CHIP GARAGE EPOXY FLOORING KIT

Epoxy Floor Kit – Epoxy-Coat Good Half Kit Gray Base – Amazon.com

Armor Chip Garage Epoxy Floor Coating ArmorGarage
Garage Floor Coatings Gallery San Antonio, TX

Related Posts:
- Color Chips For Epoxy Floors
- Epoxy Garage Floor Business
- Decorative Quartz Epoxy Flooring
- Epoxy Floor Moisture Barrier
- Epoxy Flooring Commercial Kitchen
- Rustoleum Epoxy Floor Paint Instructions
- Best Epoxy Floor Paint
- What Is The Best Epoxy Floor Coating For Garage
- Metallic Epoxy Floor Images
- Epoxy Coat Floor Coating Kit
Introduction to Hardcoat Epoxy Garage Floor Kit
A hardcoat epoxy garage floor kit is a great way to protect your garage floor and make it look fantastic. It’s an easy-to-apply solution that not only looks good but also provides superior protection against wear and tear. The hardcoat epoxy helps prevent staining, cracking, and other damage caused by heavy use and weathering. With proper installation, a hardcoat epoxy garage floor kit can last for many years, making it a great investment in your home.
What is in a Hardcoat Epoxy Garage Floor Kit?
A hardcoat epoxy garage floor kit typically includes two components: a base coat and a top coat. The base coat is applied first, followed by the top coat. Both components are usually supplied in two-part kits, which include an activator and the actual coating material. The base coat is usually an epoxy paint or primer that provides a strong bond between the concrete surface and the top coat. The top coat is usually an acrylic urethane finish that provides superior stain resistance and durability against heavy use and weathering.
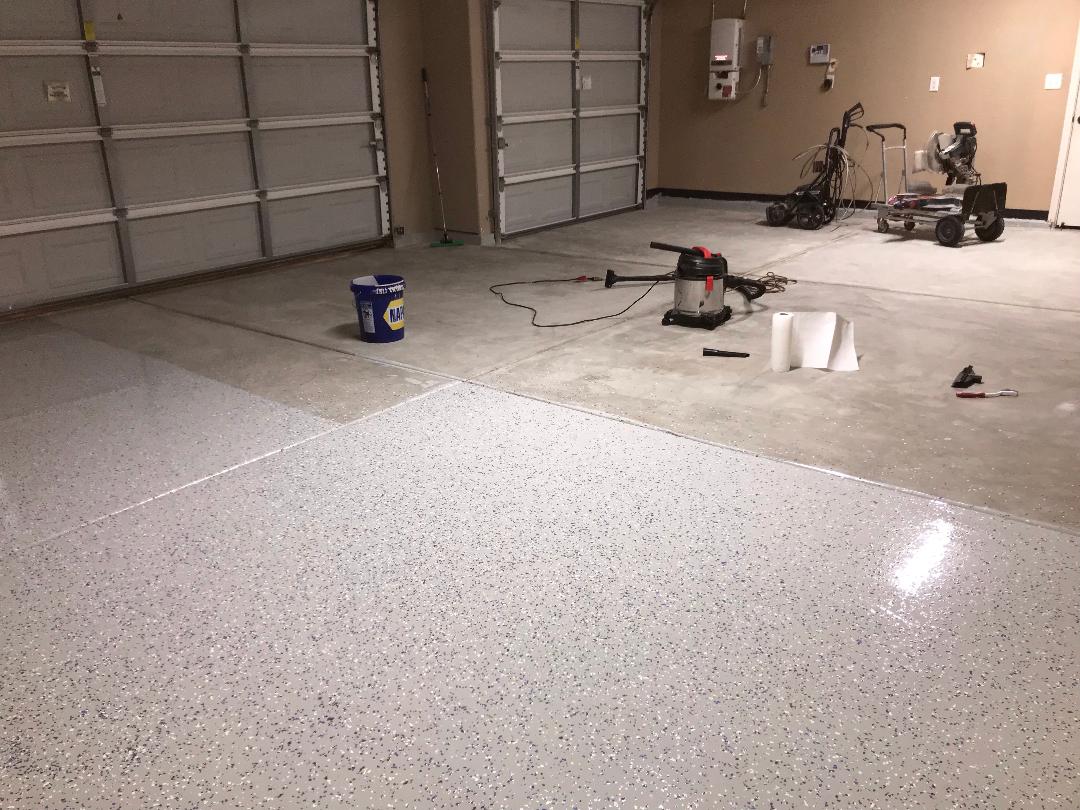
How to Prepare the Floor for Hardcoat Epoxy Garage Floor Coating?
Before you apply the hardcoat epoxy garage floor coating, it’s important to properly prepare the surface of your garage floor. This includes cleaning, repairing cracks or other damage, and then etching the surface with a concrete etcher. Cleaning involves removing dirt, dust, oil, grease, and any other contaminants from the surface of the concrete with a pressure washer or degreaser. If there are any cracks or other damage on the surface of your garage floor, repair them with an appropriate patching material before you begin etching the surface of your garage floor with a concrete etcher.
Applying Hardcoat Epoxy Garage Floor Coating
Once you have properly prepared your garage floor for coating with a hardcoat epoxy kit, you can begin applying it. Start by mixing the two components of your hardcoat epoxy kit according to the instructions on the packaging. Once it’s mixed, apply it to your garage floor using either brush or roller technique. Make sure you spread it evenly across the entire surface of your garage floor and allow it to dry completely before applying additional coats of hardcoat epoxy if needed.
Maintenance Tips for Hardcoat Epoxy Garage Floor Coating
Maintaining a hardcoat epoxy garage floor coating is relatively easy as long as you follow these simple tips:
• Clean regularly using only soap and water or mild detergents specifically designed for cleaning concrete surfaces; avoid using harsh chemicals or abrasive cleaners that could damage or discolor your hardcoat epoxy coating
• Avoid dragging heavy objects across your garage floor; doing so could cause scratches and scuff marks
• Apply a new coat of hardcoat epoxy every few years to maintain its appearance and performance
• Avoid parking vehicles directly on your coated garage floor; instead use mats or other protective materials to help protect it from tire marks
FAQs About Hardcoat Epoxy Garage Floor Kit
Q1: What is hardcoat epoxy?
A1: Hardcoat epoxy is a two-part epoxy coating that provides a strong and durable finish to garage floors. The two parts are usually supplied in two-part kits, which include an activator and the actual coating material. The base layer is usually an epoxy paint or primer that provides a strong bond between the concrete surface and the top coat. The top layer is usually an acrylic urethane finish that provides superior stain resistance and durability against heavy use and weathering.
Q2: How do I prepare my garage floor for hardcoat epoxy?
A2: Before you apply the hardcoat epoxy, it’s important to properly prepare the surface of your garage floor. This includes cleaning, repairing cracks or other damage, and then etching the surface with a concrete etcher. Cleaning involves removing dirt, dust, oil, grease, and any other contaminants from the surface of the concrete with a pressure washer or degreaser. If there are any cracks or other damage on the surface of your garage floor, repair them with an appropriate patching material before you begin etching the surface of your garage floor with a concrete etcher.
What tools are needed to install a Hardcoat Epoxy Garage Floor Kit?
1. A shop vacuum2. An industrial floor sander
3. A roller for coating the epoxy
4. Safety gear (goggles, gloves, respirator)
5. Drop cloths
6. Paint brushes
7. Putty knives and scrapers
8. Epoxy stirring stick
9. Epoxy mixing buckets
10. Paint rollers and extension poles