Government and educational buildings have also made use of this flooring choice for rather a long time. US Floors products come for the most part in earth tones, one different being their popular "Ocean Turquois" offering. Nevertheless, installations over a current floor will need to just be executed if the current floor is in decent condition and level.
Images about How To Install Cork Flooring Tiles
/cdn.vox-cdn.com/uploads/chorus_image/image/65892042/h1006handbook08.0.jpg)
This cellular structure in addition makes cork quite durable and quite comfortable; if you don't trust us go to a showroom today and evaluate it out. However, we can't forget to point out 3 more issues, the beauty, the durability and also the usefulness of organic cork flooring. The kitchen to aid in force on the back as well as legs.
How to Install Cork Flooring- Cork Flooring Installation Made Easy

Cork flooring is natural and made out of the bark of this cork oak tree. This is distinct from hard wood floors, which destroy the entire tree to come up with the product. This is unlucky as cork comes with a number of environmental and health advantages which make them great for many household areas and homeowners. It's tough, resilient, and easier to stand on and walk on than hardwood or maybe tile flooring.
How to Install Cork Tile Flooring (DIY) Family Handyman

All in all, the cellular composition of cork can be quite dense. Cork floor surfaces are presently popular, like the majority of flooring choices, they both have benefits and drawbacks connected with them. Cork is an all natural, eco-friendly flooring option for those who are interested in a greener home or even who are dealing with allergies.
How to Install a Cork Floor – This Old House
/cdn.vox-cdn.com/uploads/chorus_asset/file/22873091/H1006HANDBOOK01.jpg)
How to Install Cork Tile Flooring (DIY) Family Handyman

How to Install Cork Flooring – (Tips and Guidelines For Your DIY

Installing Glue Down Cork Tiles Installation Lay How – Cancork
How to Install Cork Tile Flooring (DIY) Family Handyman

Cork Flooring In the Bathroom?Learning Center

How to Install Glue Down Cork Flooring Over Concrete Subfloor in Bathroom and Kitchen

Cork Flooring Installation – How to Do It DIY Home Improvement
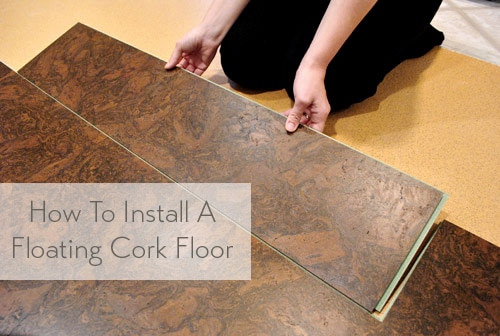
How To Install A Floating Cork Floor Young House Love
How to Prepare a Cork Flooring SubfloorLearning Center

Cork Glue Down Floors u2014 Jelinek Cork Group®
Related Posts:
- Washing Cork Floors
- Mosaic Cork Flooring
- Rustic Cork Flooring
- How To Make Cork Floors Shine
- Cork Plank Flooring Reviews
- Cork Tiles For Floor Peel And Stick
- Flooring Cork Expansion Strips
- Millstead Burnished Straw Plank Cork Flooring
- Cork Flooring Over Ceramic Tile
- Wood Grain Cork Flooring
How To Install Cork Flooring Tiles
Cork flooring is becoming an increasingly popular choice for homeowners due to its durability, eco-friendliness, and unique aesthetic appeal. Whether you’re looking to add warmth and character to your living space or simply want a sustainable flooring option, cork tiles can be an excellent choice. In this article, we will guide you through the step-by-step process of installing cork flooring tiles in your home.
1. Preparing the Subfloor
Before you begin installing cork flooring tiles, it’s crucial to ensure that the subfloor is clean, dry, and level. Start by removing any existing flooring material and thoroughly vacuuming or sweeping the subfloor to remove any dust or debris. Next, inspect the subfloor for any signs of moisture or unevenness. If there are any moisture issues, it’s essential to address them before proceeding with the installation process. Additionally, if the subfloor has any noticeable uneven areas, consider using a self-leveling compound to create a smooth surface for the cork tiles.
2. Acclimate the Cork Tiles
Cork is a natural material that expands and contracts with changes in temperature and humidity. Therefore, it’s crucial to allow the cork tiles to acclimate to the room where they will be installed before starting the installation process. Ideally, you should leave the cork tiles in their packaging in the designated room for at least 48 hours prior to installation. This will allow them to adjust to the room’s temperature and humidity levels.
3. Plan Your Layout
Before you start laying down the cork tiles, take some time to plan your layout carefully. Begin by measuring the length and width of the room and calculating how many square feet of cork tiles you will need. It’s advisable to purchase around 10% more than what you think you’ll need to account for any mistakes or waste during installation.
Once you have determined how many tiles you need, decide on the starting point for your installation. It’s generally recommended to start from the center of the room and work your way out towards the walls. This will create a more symmetrical and visually appealing look. Use a chalk line or straightedge to establish a guideline for the first row of tiles.
4. Apply Adhesive
To secure the cork tiles to the subfloor, you will need to apply adhesive on both the subfloor and the back of each tile. Start by spreading a thin layer of adhesive onto the subfloor using a trowel or a notched trowel. Be sure to follow the manufacturer’s instructions regarding the specific type of adhesive and application technique.
Next, apply adhesive to the back of each cork tile using a trowel or brush. Make sure to cover the entire surface evenly, paying extra attention to the edges. It’s important not to apply too much adhesive, as it can seep through the seams between tiles and create an uneven surface.
5. Install Cork Tiles
Once you have applied adhesive to both the subfloor and cork tiles, it’s time to start laying down the tiles. Begin by placing the first tile at the starting point you established earlier, aligning it with the guideline you created. Press down firmly on the tile to ensure it adheres to the adhesive.
Continue installing additional tiles, working your way out from the center towards the walls. Make sure to leave a small gap, usually around 1/8 inch, along all edges of the room to allow for expansion and contraction of the cork flooring.
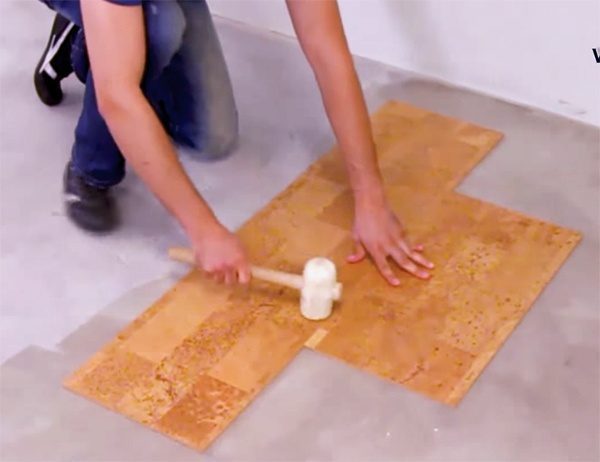
As You install each tile, use a rubber mallet or a rolling pin to firmly press it into place and ensure it is level with the surrounding tiles. If any adhesive oozes out from between the tiles, wipe it away with a damp cloth before it dries.
6. Trim and Finish
Once all the cork tiles are installed, you may need to trim them to fit along the edges of the room or around obstacles such as door frames. Use a utility knife or a jigsaw to carefully cut the tiles to size. Be sure to wear protective gloves and eyewear while cutting.
After trimming, apply a finish to the cork floor to protect it and enhance its appearance. There are various types of finishes available, such as polyurethane or wax. Follow the manufacturer’s instructions for applying and maintaining the chosen finish.
In conclusion, installing cork tiles can be a rewarding DIY project that adds warmth and beauty to your space. By following these steps and taking proper precautions, you can achieve a professional-looking result that will last for years to come. Installing cork tiles can be a rewarding DIY project that adds warmth and beauty to your space. Here are the steps you can follow to achieve a professional-looking result:
1. Prepare the Subfloor:
– Ensure that the subfloor is clean, dry, and level.
– Remove any existing flooring, adhesive residue, or protruding nails.
– Repair any cracks or imperfections in the subfloor.
2. Acclimate the Cork Tiles:
– Open the packages of cork tiles and let them acclimate to the room’s temperature and humidity for at least 48 hours.
– This step is important to prevent expansion or contraction of the tiles after installation.
3. Plan and Layout:
– Measure the dimensions of the room and calculate how many tiles you will need.
– Plan the layout by determining where you want to start laying the tiles.
– It is generally recommended to start from the center of the room and work your way out towards the walls.
– Use a chalk line or straightedge to establish a guideline for the first row of tiles.
4. Apply Adhesive:
– To secure the cork tiles to the subfloor, apply adhesive on both the subfloor and the back of each tile.
– Spread a thin layer of adhesive onto the subfloor using a trowel or notched trowel, following the manufacturer’s instructions for application technique and adhesive type.
– Apply adhesive to the back of each cork tile using a trowel or brush, ensuring even coverage on the entire surface.
5. Install Cork Tiles:
– Start laying down the tiles by placing the first tile at the starting point you established earlier, aligning it with the guideline you created.
– Press down firmly on each tile to ensure it adheres to the adhesive.
– Continue installing additional tiles, working your way out from the center towards the walls.
– Leave a small gap, usually around 1/8 inch, along all edges of the room to allow for expansion and contraction of the cork flooring.
– Use a rubber mallet or rolling pin to firmly press each tile into place and ensure it is level with the surrounding tiles.
– Wipe away any adhesive that oozes out from between the tiles with a damp cloth before it dries.
6. Trim and Finish:
– Trim the cork tiles to fit along the edges of the room or around obstacles such as door frames using a utility knife or jigsaw.
– Wear protective gloves and eyewear while cutting.
– After trimming, apply a finish to the cork floor to protect it and enhance its appearance.
– Choose a suitable finish such as polyurethane or wax and follow the manufacturer’s instructions for application and maintenance.
By following these steps and taking proper precautions, you can achieve a professional-looking result that will last for years to come.